Configure the RC Input
by Yang/wdaehn, with edits by OlliW
The orientation of the camera can be controlled by a variety of external input signals such as from a receiver, a joystick, or buttons. The source of the input signal and the exact behavior of the camera in relation to the input is configured in the [Rc Inputs] tab, which is described in the first chapter below. Physically the signal sources need to be connected to certain pins on the controller. The various possibilities are described in the subsequent chapters. For a general overview of the available pins on the controller consult Pins and Connectors.
GUI Settings
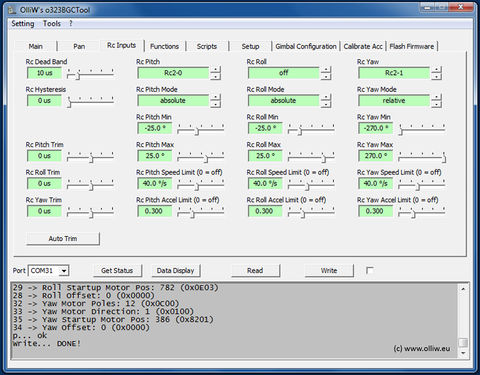
The response of the camera to an input signal, e.g. a movement of a transmitter stick, is determined by these parameters:
- Rc Dead Band: Defines how wide the neutral range around the input signal's center is. It becomes relevant e.g. then transmitter/receivers are used to control the relative movements, the Yaw axis usually. If you find a slow but constant movement on the Yaw axis because the transmitter stick does not re-position itself perfectly to center, then increase the deadband range a bit. 10 us requires a precise setting, double it or more. A typical value would be 15 us. Applies to all input channels.
- Rc Hysteresis: Defines a neutral range around the current value of the input signal. It becomes relevant e.g. then the input signal fluctuates with time even though the transmitter stick is not moved. A typical value could be 5 to 10 us. Applies to all input channels.
- Rc Pitch Trim, Rc Roll Trim, Rc Yaw Trim: These values allow for a fine adjustment of the neutral camera orientation for each axis. Applies to all input channels, also a joystick if selected as input.
There are further fields for precisely configuring the camera movements. They can be adjusted for Pitch, Roll and Yaw individually, but function identically for each axis (with one exception). Let's use Yaw as example:
- Rc Yaw: This defines what pin this signal is taken from, and wherewith implicitly of what type it is (PWM, Sum-PPM, analog, digital).
- Rc Yaw Mode: This defines how the stick movements affect the camera orientation. Four modes are possible for yaw:
- "absolute centered": The stick controls the orientation of the camera, but such that when the stick is in neutral position the camera points exactly forward. When the stick is held completely to one side the camera orientation is given by the min (or max) degrees set by Rc Yaw Min (or Rc Yaw Max). In this mode the deadband set by Rc Dead Band is applied. This mode is the default mode (as it allows to bring back the camera to the startup orientation).
- "relative": The stick controls the movement of the camera. That is, stick in neutral position means no movement, and stick fully to one side means moving at full speed. This mode can e.g. be useful for a stick that positions itself back to center automatically.
- "absolute": In this mode the stick controls the orientation of the camera. The camera's orientation is obtained by linearly interpolating between the min and max degrees set by Rc Yaw Min and Rc Yaw Max. A deadband is not applied. This mode can e.g. be useful for the pitch axis.
- "relative turn around": For the yaw axis also this setting is available. It operates like the "relative" mode, but switches off the Min/Max limits. The camera can then be turned around indefinitely.
- Rc Yaw Min, Rc Yaw Max: The minimum and maximum value in degrees allowed for yaw movements. You can move the camera between these two extremes only. If the minimum value is greater than the maximum value, then the direction is reversed.
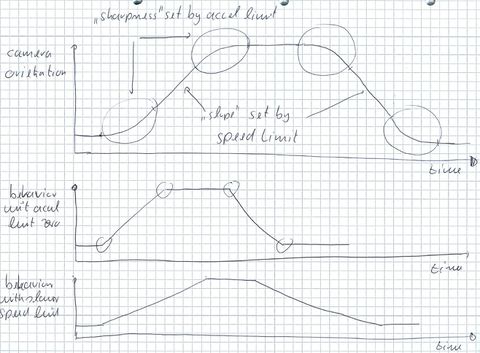
- Rc Yaw Speed Limit: The maximal speed with which the camera is turned in degrees per second. When panning the camera you do not want an extremely fast turn rate. Neither would that be controllable via a stick nor would the gimbal be able to cope with the forces. Hence you have the option to limit the turn rate to an upper speed limit.
- Rc Yaw Accel Limit: The maximal acceleration with which the camera can be moved. The larger the value the more the acceleration is reduced. When the stick is e.g. moved from full left to full right, the camera should not make the same abrupt movements. It should slowly turn faster and faster according to the given acceleration limit, as well as should slowly get slower and slower.
The effect of the Rc Yaw Speed Limit and Rc Yaw Accel Limit parameter values are also explained in this graphic:
As an example the pitch and yaw axis shall be controlled by a transmitter. The receiver outputs shall be connected to the controller board at the RC2-0 and RC2-1 pins for pitch and yaw control, respectively.
Wiring for PWM Signals
For each channel the RC receiver exposes a three pin header, which provides GND (black/brown wire), +5 V (red wire) and the RC signal (white/orange wire). Internally the GND pins of all channels are connected to each other, and likewise for the +5 V pins. The STorM32-BGC board however has only two GND pins plus the various signal pins, and no +5 V, at the RC and RC2 ports (see Pins and Connectors). This is to save space and reduce the number of cables, but also for safety (the STorM32-BGC board works internally with +3.3 V only).
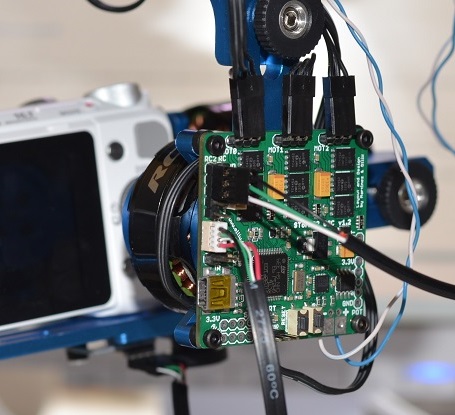
Therefore a typical connection (using the RC2 port as example) will look like this:
- One of the receiver's GND pin is connected to RC2-GND, which is the pin next to the label (see image below, the black GND cable is the top most)
- The receiver's channel 3 signal pin is connected to RC2-0 (green cable below) used for pitch
- The receiver's channel 4 signal pin is connected to RC2-1 (white cable below) used for yaw
- Roll is usually not controlled by the RC and hence not connected. There isn't any reason why the camera horizon shouldn't be level, isn't it?
Comment: The +5 V line of the receiver must not be connected to the STorM32-BGC board. The board is powered by the battery directly; the receiver by e.g. a separate BEC module, which is usually part of the ESC.
Wiring for SUM-PPM Signals
For using a Sum-PPM signal, also known as CPPM, two things need to be done:
- Connect the Sum-PPM signal to the RC-2 pin on the RC port (see Pins and Connectors). Also a GND connection is of course required.
- Configure the parameter Virtual Channel Configuration, which is found in the [Setup] tab, as a Sum-PPM. Select e.g. "sum ppm 8" if your Sum-PPM signal transmits eight channels.
The data transmitted by the Sum-PPM signal can then be used in any available function by selecting "Virtual-1" to "Virtual-12" as input.
Comment: With activated Sum-PPM, the "Rc-2" input channel returns zero value.
Wiring for Digital Signals
All STorM32 boards support Spektrum satellite, HoTT SUMD and Multiplex SRXL receivers. The v1.3 board has also support for the S-Bus (Futaba, FrySky, OrangeRX).
For using any of these signals, the procedure is as follows:
- Connect the digital data line to the RC-0 pin on the RC port (see Pins and Connectors). Also a GND connection is of course required.
- Configure the parameter Virtual Channel Configuration, which is found in the [Setup] tab, to the respective digital signal.
The data transmitted by the data line can then be used in any available function by selecting "Virtual-1" to "Virtual-16" as input. The "Rc-0" input channel will however return zero value.
Spektrum Satellite
Configure the parameter Virtual Channel Configuration to "spektrum 10 bit" or "spektrum 11 bit", depending on the type of the protocol in use.
The v1.2/v1.3 boards provide a dedicated Spektrum port. On the v1.1 boards the satellite's black wire needs to be connected to GND, the orange/red wire to one of the 3.3V pins, and the grey/white signal wire to the RC-0 pin (see Pins and Connectors).
Comment: The STorM32 board can power the satellite, if no other sinks are connected to the board. On v1.1/v1.2 boards it may happen though, that the current draw is to high.
S-Bus
Configure the parameter Virtual Channel Configuration to "sbus".
Comment: v1.1 boards do not support the S-Bus.
HoTT SUMD
Configure the parameter Virtual Channel Configuration to "hott sumd".
Rcgroups user fpvberlin has produced a nice tutorial for setting up HoTT SUMD, see here: How to use Graupner HoTT with the Storm32bgc.
Comment: The HoTT receiver needs a 5 V power supply, which cannot be obtained from the STorM32 board. Use a BEC or any other 5 V source.
Multiplex SRXL
Configure the parameter Virtual Channel Configuration to "srxl".
Comment: The Multiplex receiver needs a 5 V power supply, which cannot be obtained from the STorM32 board. Use a BEC or any other 5 V source.
Wiring for Joysticks
There are many different types of joysticks, and not all cases can hence be considered here. The most common situation is that of a resistive joystick, there the joystick positions are detected by potentiometers, one potentiometer for each axis.
Each potentiometer is connected to the POT port (see Pins and Connectors) as follows:
- The center tap (slider, wiper) goes to one of the pins POT-0, POT-1, or POT-2.
- One of the ends goes to the GND pin, and the other end to the 3.3 V pin.
- Be careful to not produce short cuts.
The potentiometer position or related joystick can then be used for control in any available function by selecting the "Pot-0", "Pot-1", or "Pot-2" option, depending on whether the potentiometer is connected to the POT-0, POT-1, or POT-2 pin.
Next Step - Basic Gimbal Functions
Depending on the type of gimbal, where and how it is used, you might want to select different modes of operation. Basically, the controller can either keep the camera at the same position with respect to the ground or with respect to the gimbal support frame, and this for each axis individually. See examples and setup strategies in the Hold versus Pan Mode chapter.


