Getting Started
Foreword
This page is to help you to make the first steps in the right direction. Every gimbal is unique because of different size, motors, and camera weight. Copying the configuration of one gimbal to another one won't usually work. You have to learn what happens with your gimbal when changing any settings. If you're not prepared for this, then the STorM32BGC, like any other gimbal controller, won't make you happy :-). Otherwise, let's get started...
Parts Checklist
- 1x STorM32BGC
- 1x MPU6050 breakout board (plus 4pol cable and plug to connect to the controller)
- 1x 3 axis gimbal with motors
- 3x motor cable (each 3pol)
- 1x Lipo 2s - 4s (plus 2pol cable and plug to connect to the controller)
- 1x USB 2.0 cable
- firmware and gui, Downloads
- 1x USB to serial adapter + 4 dupont 2.54mm cables (necessary for firmware update or first flashing)
- 1x joystick + 5 dupont 2.54mm cables (OPTIONAL)
- 1x IR led + 2 dupont 2.54mm cables (OPTIONAL)
- plenty of time and patience ;-)
For possible sources for some parts you may check out Where to buy accessories and supplies.
The Gimbal
Before you power up any electronics it is absolutely necessary to perfectly balance your gimbal, and to ensure minimum resistance to rotations (friction in bearings, stiff cables, etc). Any unbalance or distraction to free rotation will make setting up the gimbal much more difficult or even not possible. Spend some time for this step.
IMU Orientation
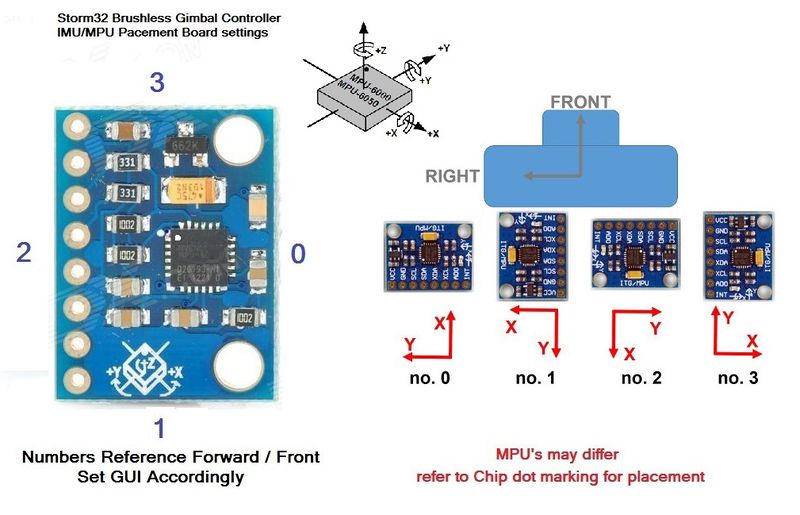
On every MPU6050 chip (STorm32BGC or breakout module) you can find a little dot (white point) in one corner. This dot shows the direction of the y axis (the corner shows to the end of the y line, its not the origin). The x axis is always face to face to the y axis, diagonal (the corner shows to the end of the x line, its not the origin). To better understand this inspect the schematics in the middle of the picture below, where the y axis (white dot) points to the up-right, and the x axis to the down-right. The z axis is always points away from the face of the chip. Now it is easy to get the right GUI settings.
Example: The IMU is on top of the camera and the white dot on the chip is, when looked at the camera from the font, showing to the left and to the roll axis. Then the IMU gui setting is no.1 (z axis points up / x axis points right).
Further examples are treated in this picture:
--- to be continued ---
