How to flash firmware: Difference between revisions
No edit summary |
Hexakopter (talk | contribs) STlink added |
||
| (51 intermediate revisions by 5 users not shown) | |||
| Line 1: | Line 1: | ||
The following describes the process of flashing firmware onto v1.1 | The following describes the process of flashing firmware onto v1.1/v1.2/v1.3/v1.31 boards. | ||
__TOC__ | __TOC__ | ||
== Flashing Firmware using a USB-TTL Adapter == | ==Flashing Firmware using a USB-TTL Adapter == | ||
'''1.''' | '''1.''' You need a standard USB-TTL adapter (FTDI, CH340, CP2102, {{WARNING|'''not'''}} PL2303, for details see [[STorM32_FAQ#Which USB-TTL should I use.3F|FAQ: Which USB-TTL should I use?]]). Ensure that it is working (drivers installed, etc.). | ||
'''2.''' | '''2.''' You don't have to worry if it is a 5 V adapter or not, the pins on the STorM32-BGC board we are going to connect the adapter to are 5 V tolerant. | ||
'''3.''' | '''3.''' The USB-TTL adapter has to be connected to UART1, which is {{WARNING|'''not'''}} the port labelled UART on the board, the correct pins are found on the port labelled RC! Namely: | ||
:RC-GND = GND -> connect it to GND of the usb-ttl adapter | :RC-GND = GND -> connect it to GND of the usb-ttl adapter | ||
| Line 17: | Line 17: | ||
:RC-1 = Uart1-Tx -> connect it to Rx of the usb-ttl adapter | :RC-1 = Uart1-Tx -> connect it to Rx of the usb-ttl adapter | ||
The connections between adapter and board are shown for v1.2/v1.3/v1.31 and v1.1 boards in the scheme below. | |||
{{COMMENT|Neither a 5 V nor a 3.3 V nor any other power pin on the usb-ttl adapter is used... only three wires running from adapter to board.}}<br/> | |||
:[[File:Stom32-bgc-flashing-w-usbttladapter-connections-02.jpg|800px]] | |||
''' | '''4.''' The board should be powered via the USB plug or through a battery/power supply connected to the "+" and "-" pads. | ||
{{COMMENT| | {{COMMENT|If the board has already a firmware installed and this is the first-time it is connected via USB to a PC, then Win 7 will start installing the USB driver. {{WARNING|'''Do NOT interrupt the install process'''}}. See also the comments under point '''12''' below.}} | ||
'''5.''' Run the GUI and go to the {{GUI|Flash Firmware}} tab (see the screenshot). | |||
{{COMMENT|In principle you can use any GUI version to flash any version of the firmware. However, a GUI which is of the same or higher version than the firmware provides easy access to the firmware via the selector fields on the {{GUI|Flash Firmware}} window.}} | |||
:[[File:Stom32-wiki-flash-firmware-01.jpg|640px]] | |||
''' | '''6.''' Select the correct board and desired firmware version from the selectors. | ||
{{COMMENT| | {{COMMENT|With these two selectors the correct firmware .hex file is chosen in the {{GUI|Selected Firmware Hex File}} field.}}<br/> | ||
{{COMMENT| | {{COMMENT|It is {{WARNING|'''important'''}} to choose the correct board version; otherwise the board will not functions correctly.}} | ||
''' | '''7.''' Select {{GUIPARAM|System Bootloader @ UART1}} in the {{GUI|STM32 Programmer}} field. | ||
'''10.''' | '''8.''' In the {{GUI|Com Port}} field select the COM port which your usb-ttl adapter is connected to. | ||
{{COMMENT|We are talking here about the {{GUI|Com Port}} field in the {{GUI|Flash Firmware}} tab, not the {{GUI|Port}} field in the lower left of the main window.}}<br/> | |||
{{COMMENT|If you are not sure which the correct COM port is, then disconnect the usb-ttl adapter from the PC, inspect the drop-down list and memorize the available COM ports, connect your adapter and wait until its enumerated by Win, and finally inspect the drop-down list and chose the newly added COM port.}} | |||
'''9.''' If required or desired check the {{GUI|Perform full chip erase}} check button. | |||
'''10.''' This is now {{WARNING|'''important'''}}: Before hitting the {{GUI|Flash Firmware}} button one has to ready the board for being flashed. For that, with the board connected to power, one has to | |||
* press and hold down both the Reset and Boot0 buttons (the exact sequence of when which button is pressed is irrelevant, as long as they're both hold down) | * press and hold down both the Reset and Boot0 buttons (the exact sequence of when which button is pressed is irrelevant, as long as they're both hold down) | ||
* then, release the Reset button while still holding down the Boot0 button | * then, release the Reset button while still holding down the Boot0 button | ||
| Line 49: | Line 53: | ||
This may sound complicated, but one will quickly realize that this can be done by "rolling" the finger tip from the left to right. | This may sound complicated, but one will quickly realize that this can be done by "rolling" the finger tip from the left to right. | ||
{{COMMENT| | {{COMMENT|Both LEDs will go off; they should appear "dead".}} | ||
:[[File:Storm32-wiki-flash-firmware-key-sequence-01.jpg|640px]] | |||
'''11.''' Finally, hit the {{GUI|Flash Firmware}} button. | |||
Now a black window (DOS console) should open and run the flash loader program, as shown in the screenshot. Wait until it's finished (takes some seconds). If the program doesn't proceed and asks to "Press any key to continue" the board is write protected. See "Removing Write Protection" below. | |||
:[[File:flash.png|640px]] | |||
'''12.''' The STorM32 board will be reset and start running. If this is the first-time flash of the firmware and if the board is connected via USB to a PC, then Win 7 will immediately start with installing the appropriate USB driver. This takes quite a while (several minutes). Please, be patient and wait until Win 7 reports that the device is ready for use. {{WARNING|'''Do not disconnect the board from the PC or otherwise interrupt the driver installation process before it is completed'''}}. This can mess up things quite considerably, and installing the driver later can be a challenge. | |||
=== Flashing the Micro STorM32 Board === | |||
---- | |||
The Micro STorM32 board doesn't provide BOOT0 and RESET buttons. Here, BOOT0 must be shortcut to 3.3 V by e.g. soldering a wire as shown in the picture below, and powering up the board to bring it into bootloader mode. | |||
:[[File:MicroStorm32.png|387px]] | |||
=== Flashing Procedure for Win XP === | |||
---- | |||
'''1.''' Download and install the Flash Loader Demonstrator from [http://www.st.com/web/en/catalog/tools/PF257525]. | |||
'''2.''' Do step 1 to 4 under [[#Flashing Firmware using a USB-TTL Adapter|Flashing Firmware using a USB-TTL Adapter]]. | |||
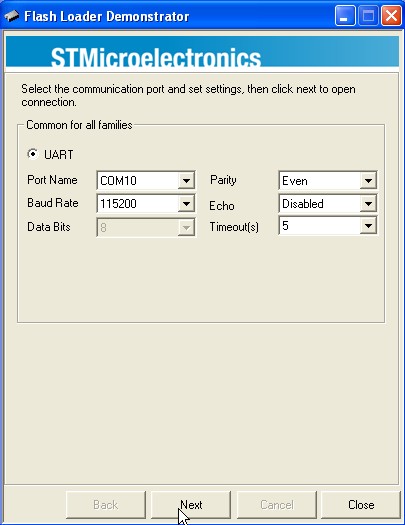
''' | '''3.''' Start the Flash Loader Demonstrator, choose the correct COM port and then press the Boot0 and Reset buttons on the controller as described in step 10 under [[#Flashing Firmware using a USB-TTL Adapter|Flashing Firmware using a USB-TTL Adapter]]. Click next. | ||
{{COMMENT|The usb-ttl adapter needs to be connected to the PC before the Flash Loader Demonstrator is started}}. | |||
:[[File:XPFirmware1.jpg]] | |||
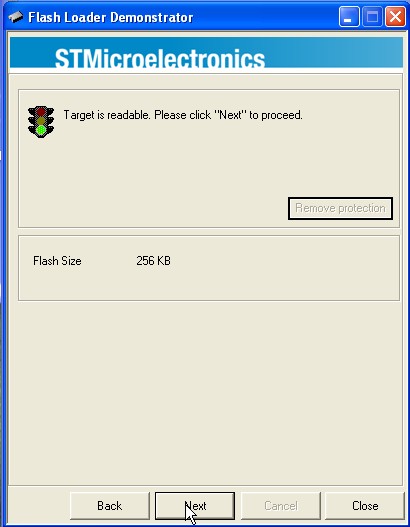
'''4.''' If you have connected the usb-ttl adapter correctly and pressed the buttons you should see a green light and it should say that the target is readable. Click next. | |||
:[[File:XPFirmware2.jpg]] | |||
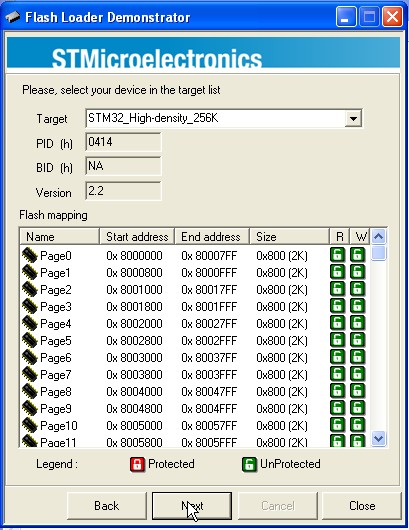
'''5.''' The target on the next page should be correct, otherwise you will have to choose the controller and click next. | |||
:[[File:XPFirmware3.jpg]] | |||
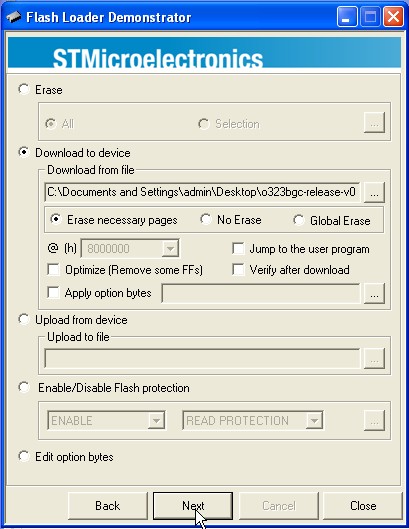
'''6.''' Browse to the correct firmware file and click next. The upgrade will start. | |||
:[[File:XPFirmware4.jpg]] | |||
'''7.''' After the firmware is downloaded to the controller you must restart it and it is now ready for use. | |||
:[[File:ready.jpg]] | |||
=== Removing Read&Write Protections === | |||
---- | |||
Some boards are unfortunately shipped with a read/write protection on the flash. As a result, storing parameters permanently in the board and flashing new firmware will fail. To remove the protections do the following: | |||
'''1.''' Follow steps 1-3 of [[#Flashing Procedure for Win XP|Flashing Procedure for Win XP]] for downloading, installing and starting the Flash Loader Demonstrator of STMicroelectronics. | |||
'''2.''' Do also step 4, you will now however see the message '''WARNING: When you click "Remove Protection" the flash will be mass erased and all data will be lost.'''. Click on '''Remove Protection'''. This will remove the protections, as well as fully erase the flash memory. | |||
'''3.''' Close the Flash Loader Demonstrator after it has completed and restart the STorM32 board. The LEDs are not operational since also any firmware got erased in the previous step. | |||
'''4.''' Go back to the [[#Flashing Firmware using a USB-TTL Adapter|Flashing Firmware using a USB-TTL Adapter]] section in the above and flash the firmware anew. | |||
=== Trouble Shooting === | === Trouble Shooting === | ||
* On Win XP flashing via the GUI using the usb-ttl adapter will fail (the compiled exe version of the flashloader doesn't work on XP, sorry for that). | ---- | ||
* If the verify fails then first check that you | |||
* In order to test if the usb-ttl adapter is working properly, you can connect its Rx and Tx pins with each other, and use a terminal program, such as Hterm. When you send characters they should be immediately received. | |||
* If the USB is not working, please double-check that you've selected the correct board version in the {{GUI|STorM32-BGC board}} field. | |||
* In case you have troubles with the USB driver, see the [[STorM32_FAQ#Which_drivers_are_needed_for_the_USB.3F|FAQ: Which drivers are needed for the USB?]]. | |||
* In case the black DOS box doesn't show up, check if the firmware .zip file was extracted. | |||
* In case the black DOS box shows the [OK] messages, but the downloading and verifying message lines are not present, go to [[#Removing Read&Write Protections|Removing Read&Write Protections]]. | |||
* On Win XP flashing via the GUI using the usb-ttl adapter will fail (the compiled .exe version of the flashloader doesn't work on XP, sorry for that). See the next sub section [[#Flashing Procedure for Win XP|Flashing Procedure for Win XP]]. | |||
* If the verify fails then first check that you are not using an outdated GUI version. Otherwise, check the {{GUI|Perform full chip erase}} check button and repeat. This will however also erase any setting which you might have stored before. In that case save the settings to a file beforehand using the option in the "Setting" menu. | |||
== Flashing Firmware using a STLink/V2 (SWD) Programmer == | == Flashing Firmware using a STLink/V2 (SWD) Programmer == | ||
'''1.''' You need a STLink/V2 programmer. To buy one just search for "STlink" on ebay, aliexpress, etc. They look something like this: | |||
:[[File:ST_Link_V2.jpg|250px]] | |||
'''2.''' You need to install the right driver. You can found and download it here: [http://www.st.com/web/en/catalog/tools/PF260219 STLINK-V2 driver] | |||
'''3.''' Connect the SWD pins from the Storm32 board to the pins of your STlink programmer. The SWD pins on the Storm32BGC are near the AUX ports. | |||
:"SWDIO" to "SWDIO" | |||
:"SWCLK" to "SWCLK" | |||
:"GND" to "GND" | |||
'''4.''' Power up your Storm32BGC over USB (I recommend to unplug the motor plugs first) and connect your STlink programmer over USB. | |||
'''5.''' Go to the "Flash Firmware" tab and choose your settings. It should look something like that: | |||
:[[File:Flash_GUI.png|700px]] | |||
'''6.''' Push the "Flash Firmware" button. The cmd.exe should open and after a successful run it should look like that: | |||
:[[File:Flash_CMD.png|700px]] | |||
Latest revision as of 12:39, 10 December 2015
The following describes the process of flashing firmware onto v1.1/v1.2/v1.3/v1.31 boards.
Flashing Firmware using a USB-TTL Adapter
1. You need a standard USB-TTL adapter (FTDI, CH340, CP2102, not PL2303, for details see FAQ: Which USB-TTL should I use?). Ensure that it is working (drivers installed, etc.).
2. You don't have to worry if it is a 5 V adapter or not, the pins on the STorM32-BGC board we are going to connect the adapter to are 5 V tolerant.
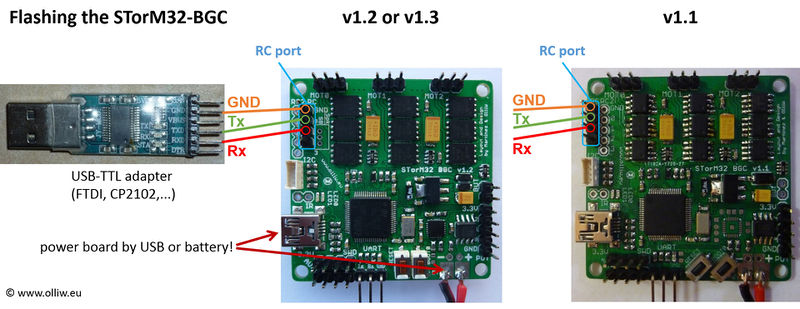
3. The USB-TTL adapter has to be connected to UART1, which is not the port labelled UART on the board, the correct pins are found on the port labelled RC! Namely:
- RC-GND = GND -> connect it to GND of the usb-ttl adapter
- RC-0 = Uart1-Rx -> connect it to Tx of the usb-ttl adapter
- RC-1 = Uart1-Tx -> connect it to Rx of the usb-ttl adapter
The connections between adapter and board are shown for v1.2/v1.3/v1.31 and v1.1 boards in the scheme below.
Comment: Neither a 5 V nor a 3.3 V nor any other power pin on the usb-ttl adapter is used... only three wires running from adapter to board.
4. The board should be powered via the USB plug or through a battery/power supply connected to the "+" and "-" pads.
Comment: If the board has already a firmware installed and this is the first-time it is connected via USB to a PC, then Win 7 will start installing the USB driver. Do NOT interrupt the install process. See also the comments under point 12 below.
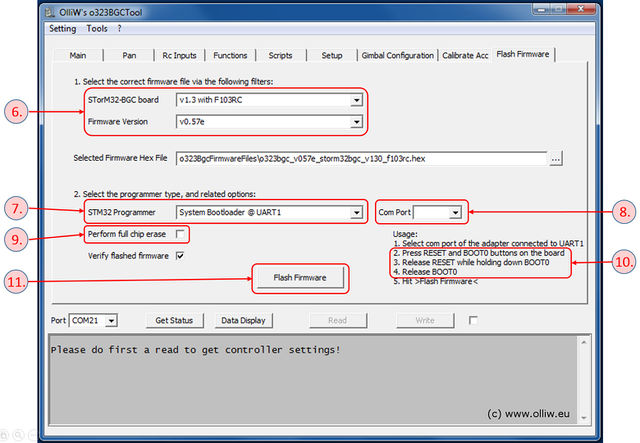
5. Run the GUI and go to the [Flash Firmware] tab (see the screenshot).
Comment: In principle you can use any GUI version to flash any version of the firmware. However, a GUI which is of the same or higher version than the firmware provides easy access to the firmware via the selector fields on the [Flash Firmware] window.
6. Select the correct board and desired firmware version from the selectors.
Comment: With these two selectors the correct firmware .hex file is chosen in the [Selected Firmware Hex File] field.
Comment: It is important to choose the correct board version; otherwise the board will not functions correctly.
7. Select "System Bootloader @ UART1" in the [STM32 Programmer] field.
8. In the [Com Port] field select the COM port which your usb-ttl adapter is connected to.
Comment: We are talking here about the [Com Port] field in the [Flash Firmware] tab, not the [Port] field in the lower left of the main window.
Comment: If you are not sure which the correct COM port is, then disconnect the usb-ttl adapter from the PC, inspect the drop-down list and memorize the available COM ports, connect your adapter and wait until its enumerated by Win, and finally inspect the drop-down list and chose the newly added COM port.
9. If required or desired check the [Perform full chip erase] check button.
10. This is now important: Before hitting the [Flash Firmware] button one has to ready the board for being flashed. For that, with the board connected to power, one has to
- press and hold down both the Reset and Boot0 buttons (the exact sequence of when which button is pressed is irrelevant, as long as they're both hold down)
- then, release the Reset button while still holding down the Boot0 button
- then, release also the Boot0 button
This may sound complicated, but one will quickly realize that this can be done by "rolling" the finger tip from the left to right.
Comment: Both LEDs will go off; they should appear "dead".
11. Finally, hit the [Flash Firmware] button.
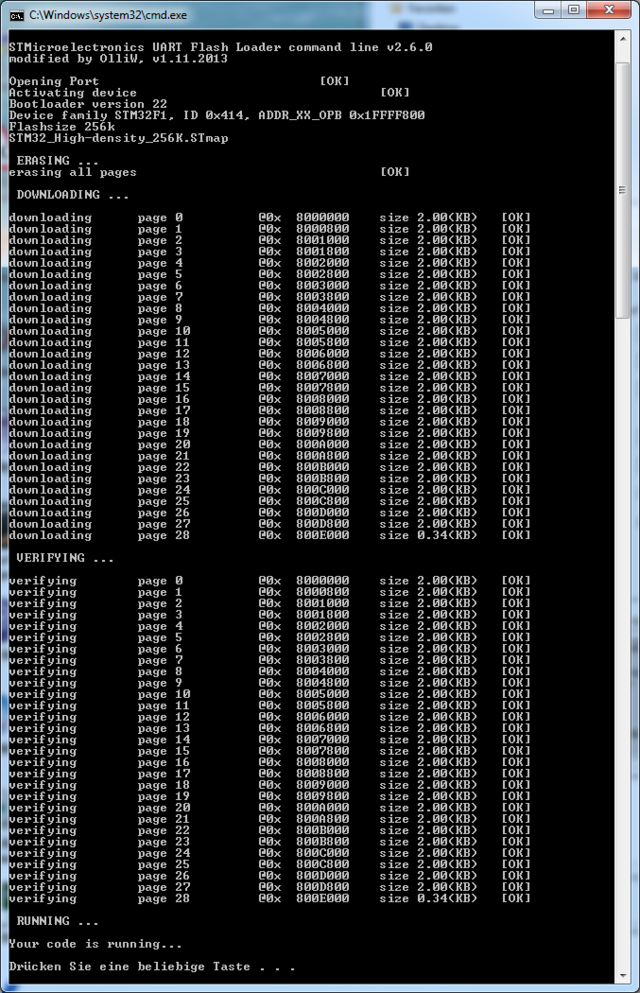
Now a black window (DOS console) should open and run the flash loader program, as shown in the screenshot. Wait until it's finished (takes some seconds). If the program doesn't proceed and asks to "Press any key to continue" the board is write protected. See "Removing Write Protection" below.
12. The STorM32 board will be reset and start running. If this is the first-time flash of the firmware and if the board is connected via USB to a PC, then Win 7 will immediately start with installing the appropriate USB driver. This takes quite a while (several minutes). Please, be patient and wait until Win 7 reports that the device is ready for use. Do not disconnect the board from the PC or otherwise interrupt the driver installation process before it is completed. This can mess up things quite considerably, and installing the driver later can be a challenge.
Flashing the Micro STorM32 Board
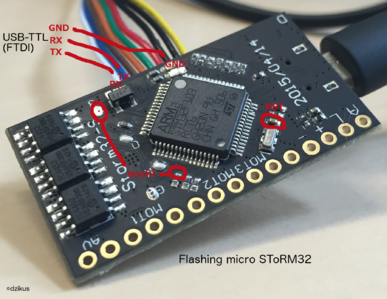
The Micro STorM32 board doesn't provide BOOT0 and RESET buttons. Here, BOOT0 must be shortcut to 3.3 V by e.g. soldering a wire as shown in the picture below, and powering up the board to bring it into bootloader mode.
Flashing Procedure for Win XP
1. Download and install the Flash Loader Demonstrator from [1].
2. Do step 1 to 4 under Flashing Firmware using a USB-TTL Adapter.
3. Start the Flash Loader Demonstrator, choose the correct COM port and then press the Boot0 and Reset buttons on the controller as described in step 10 under Flashing Firmware using a USB-TTL Adapter. Click next.
Comment: The usb-ttl adapter needs to be connected to the PC before the Flash Loader Demonstrator is started.
4. If you have connected the usb-ttl adapter correctly and pressed the buttons you should see a green light and it should say that the target is readable. Click next.
5. The target on the next page should be correct, otherwise you will have to choose the controller and click next.
6. Browse to the correct firmware file and click next. The upgrade will start.
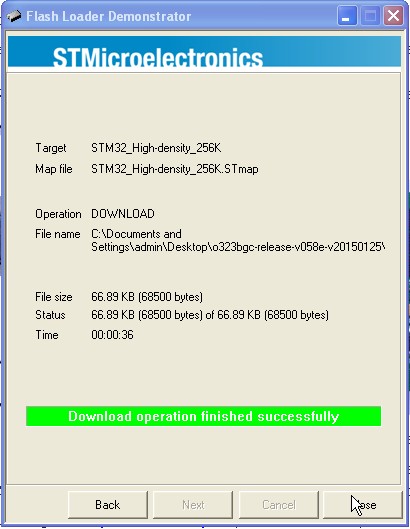
7. After the firmware is downloaded to the controller you must restart it and it is now ready for use.
Removing Read&Write Protections
Some boards are unfortunately shipped with a read/write protection on the flash. As a result, storing parameters permanently in the board and flashing new firmware will fail. To remove the protections do the following:
1. Follow steps 1-3 of Flashing Procedure for Win XP for downloading, installing and starting the Flash Loader Demonstrator of STMicroelectronics.
2. Do also step 4, you will now however see the message WARNING: When you click "Remove Protection" the flash will be mass erased and all data will be lost.. Click on Remove Protection. This will remove the protections, as well as fully erase the flash memory.
3. Close the Flash Loader Demonstrator after it has completed and restart the STorM32 board. The LEDs are not operational since also any firmware got erased in the previous step.
4. Go back to the Flashing Firmware using a USB-TTL Adapter section in the above and flash the firmware anew.
Trouble Shooting
- In order to test if the usb-ttl adapter is working properly, you can connect its Rx and Tx pins with each other, and use a terminal program, such as Hterm. When you send characters they should be immediately received.
- If the USB is not working, please double-check that you've selected the correct board version in the [STorM32-BGC board] field.
- In case you have troubles with the USB driver, see the FAQ: Which drivers are needed for the USB?.
- In case the black DOS box doesn't show up, check if the firmware .zip file was extracted.
- In case the black DOS box shows the [OK] messages, but the downloading and verifying message lines are not present, go to Removing Read&Write Protections.
- On Win XP flashing via the GUI using the usb-ttl adapter will fail (the compiled .exe version of the flashloader doesn't work on XP, sorry for that). See the next sub section Flashing Procedure for Win XP.
- If the verify fails then first check that you are not using an outdated GUI version. Otherwise, check the [Perform full chip erase] check button and repeat. This will however also erase any setting which you might have stored before. In that case save the settings to a file beforehand using the option in the "Setting" menu.
Flashing Firmware using a STLink/V2 (SWD) Programmer
1. You need a STLink/V2 programmer. To buy one just search for "STlink" on ebay, aliexpress, etc. They look something like this:
2. You need to install the right driver. You can found and download it here: STLINK-V2 driver
3. Connect the SWD pins from the Storm32 board to the pins of your STlink programmer. The SWD pins on the Storm32BGC are near the AUX ports.
- "SWDIO" to "SWDIO"
- "SWCLK" to "SWCLK"
- "GND" to "GND"
4. Power up your Storm32BGC over USB (I recommend to unplug the motor plugs first) and connect your STlink programmer over USB.
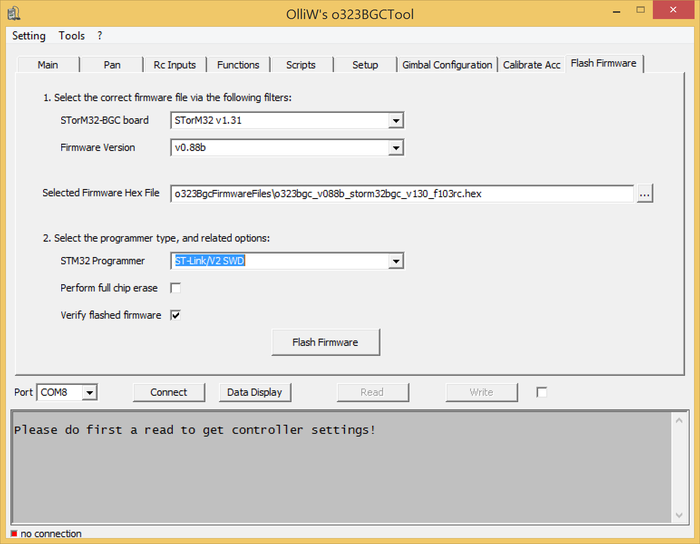
5. Go to the "Flash Firmware" tab and choose your settings. It should look something like that:
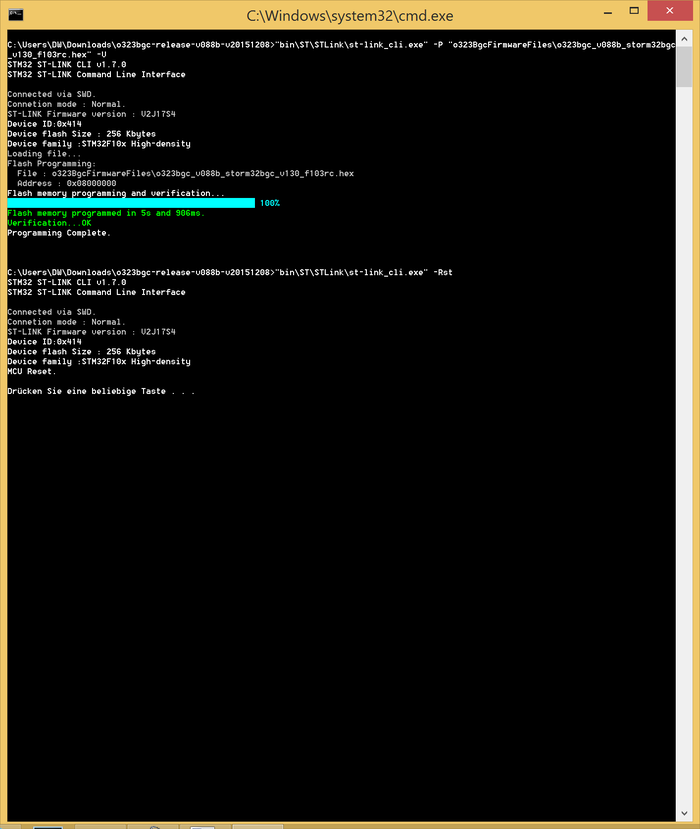
6. Push the "Flash Firmware" button. The cmd.exe should open and after a successful run it should look like that:
