Updating the Firmware of NT Modules: Difference between revisions
| (15 intermediate revisions by 2 users not shown) | |||
| Line 1: | Line 1: | ||
All NT Modules can be updated with a new firmware using the procedure below. | All NT Modules can be updated with a new firmware using the procedure below. | ||
{{COMMENT|Updating implies that the module has a NT firmware running. If the module has never been flashed with a NT firmware before, or runs a different firmware, you must do | {{COMMENT|Updating implies that the module has a NT firmware running. If the module has never been flashed with a NT firmware before, or runs a different firmware, you must first do a "First Time Flashing". Please consult the respective wiki pages.}} | ||
== Updating Procedure == | == Updating Procedure == | ||
'''1.''' You need a USB-TTL adapter with FTDI chip set | '''1.''' You need a USB-TTL adapter with a FTDI chip set, CH340 chip set, or [[How to configure CP2102 USB adapters for high baud rates|properly configured CP2102]] ({{WARNING|'''not'''}} PL2303). Ensure that it is working (drivers installed, etc.). | ||
{{COMMENT|To avoid confusion | {{COMMENT|To avoid confusion on which USB TTL adapter to use, please read [[STorM32_FAQ#Which USB-TTL should I use.3F|FAQ: Which USB-TTL should I use?]].}} | ||
'''2.''' Connect the USB-TTL adapter to the NT bus connector. | '''2.''' Connect the USB-TTL adapter to the NT bus connector. | ||
: | :GND -> connect it to GND of the USB-TTL adapter | ||
: | :Tx -> connect it to Rx of the USB-TTL adapter | ||
: | :Rx -> connect it to Tx of the USB-TTL adapter | ||
: | :VCC -> connect it to power from the USB-TTL adapter | ||
The connections between USB-TTL adapter and NT module are shown in the scheme below. | |||
{{COMMENT|For the CC3D Atom this power scheme often doesn't work. Please use an external power supply, or power it via its USB connector.}} | |||
:[[File:Storm32-nt-firmware-updating-02.jpg|640px]] | |||
'''3.''' Connect the USB-TTL adapter to the computer and open the GUI. | '''3.''' Connect the USB-TTL adapter to the computer and open the GUI. | ||
| Line 23: | Line 29: | ||
'''4.''' Go to the {{GUI|Flash Firmware}} tab as seen below. Choose the firmware in the {{GUI|STorM32-BGC board}} combo box field, or via the {{GUI|Selected Firmware Hex File}} text field. Select {{GUIPARAM|System Bootloader @ UART1}} in the {{GUI|STM32 Programmer}} field, and the {{GUI|Com Port}} associated with your USB-TTL adapter. Ensure that the {{GUIPARAM|Use NT boot mode}} check box is checked. | '''4.''' Go to the {{GUI|Flash Firmware}} tab as seen below. Choose the firmware in the {{GUI|STorM32-BGC board}} combo box field, or via the {{GUI|Selected Firmware Hex File}} text field. Select {{GUIPARAM|System Bootloader @ UART1}} in the {{GUI|STM32 Programmer}} field, and the {{GUI|Com Port}} associated with your USB-TTL adapter. Ensure that the {{GUIPARAM|Use NT boot mode}} check box is checked. | ||
:[[File: | :[[File:Storm32-nt-firmware-updating-gui-screen-01.jpg|640px]] | ||
'''5.''' Hit the {{GUI|Flash Firmware}} button. A DOS box will open, and the firmware will be flashed. | '''5.''' Hit the {{GUI|Flash Firmware}} button. A DOS box will open, and the firmware will be flashed. | ||
:[[File:GUI_Flash_2.jpg|640px]] | :[[File:GUI_Flash_2.jpg|640px]] | ||
Latest revision as of 14:25, 3 March 2016
All NT Modules can be updated with a new firmware using the procedure below.
Comment: Updating implies that the module has a NT firmware running. If the module has never been flashed with a NT firmware before, or runs a different firmware, you must first do a "First Time Flashing". Please consult the respective wiki pages.
Updating Procedure
1. You need a USB-TTL adapter with a FTDI chip set, CH340 chip set, or properly configured CP2102 (not PL2303). Ensure that it is working (drivers installed, etc.).
Comment: To avoid confusion on which USB TTL adapter to use, please read FAQ: Which USB-TTL should I use?.
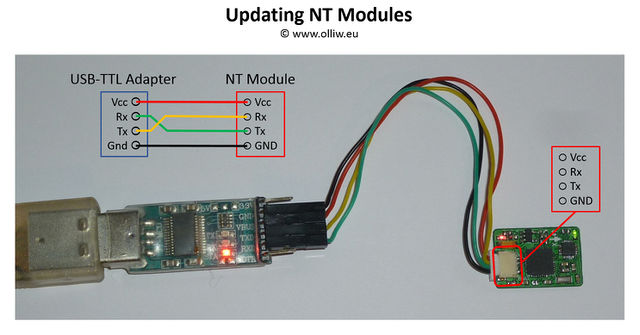
2. Connect the USB-TTL adapter to the NT bus connector.
- GND -> connect it to GND of the USB-TTL adapter
- Tx -> connect it to Rx of the USB-TTL adapter
- Rx -> connect it to Tx of the USB-TTL adapter
- VCC -> connect it to power from the USB-TTL adapter
The connections between USB-TTL adapter and NT module are shown in the scheme below.
Comment: For the CC3D Atom this power scheme often doesn't work. Please use an external power supply, or power it via its USB connector.
3. Connect the USB-TTL adapter to the computer and open the GUI.
4. Go to the [Flash Firmware] tab as seen below. Choose the firmware in the [STorM32-BGC board] combo box field, or via the [Selected Firmware Hex File] text field. Select "System Bootloader @ UART1" in the [STM32 Programmer] field, and the [Com Port] associated with your USB-TTL adapter. Ensure that the "Use NT boot mode" check box is checked.
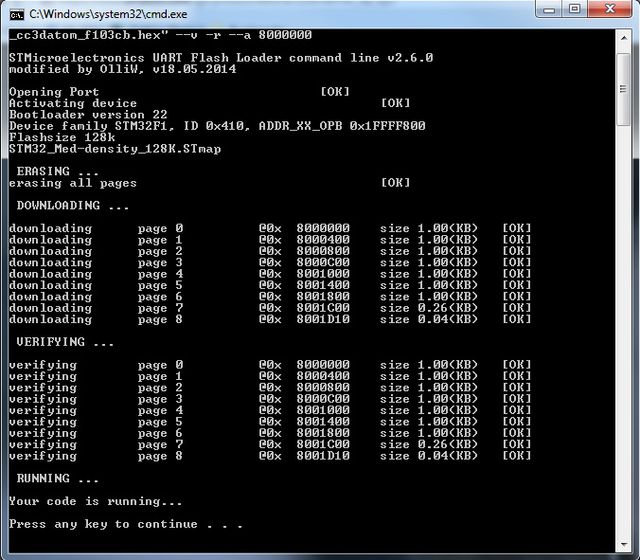
5. Hit the [Flash Firmware] button. A DOS box will open, and the firmware will be flashed.


