Docu for witespy board(s): Difference between revisions
No edit summary |
|||
| Line 6: | Line 6: | ||
The board is shipped without firmware, it hence needs first to be flashed (for instructions see below). | The board is shipped without firmware, it hence needs first to be flashed (for instructions see below). | ||
On the v1.1 board, the pins of the connector I2C#2 on the bottom side are in reverse order to those of connector I2C. Pay attention to that when connecting a second IMU to the I2C#2 port. Fortunately, it is relatively easy to swap the pins on the connectors of the supplied IMU cables. | On the v1.1 board, the pins of the connector I2C#2 on the bottom side are in reverse order to those of connector I2C, which implies also reversed polarity. Pay attention to that when connecting a second IMU to the I2C#2 port. Fortunately, it is relatively easy to swap the pins on the connectors of the supplied IMU cables. | ||
== Shop Links == | == Shop Links == | ||
| Line 44: | Line 44: | ||
=== Flashing Firmware === | === Flashing Firmware === | ||
---- | ---- | ||
Follow the instructions for {{WARNING|v1.3 boards}} in the [[How to flash firmware]] manual. | Follow the instructions for {{WARNING|'''v1.3 boards'''}} in the [[How to flash firmware]] manual. | ||
[[File:Stom32-bgc-v130-flashing-w-usbttladapter-connections-01.jpg|600px]] | [[File:Stom32-bgc-v130-flashing-w-usbttladapter-connections-01.jpg|600px]] | ||
| Line 60: | Line 60: | ||
[[File:Stom32-bgc-v110-ports-and-connections-01.jpg|450px]] | [[File:Stom32-bgc-v110-ports-and-connections-01.jpg|450px]] | ||
{{COMMENT|The pins | {{COMMENT|{{WARNING|'''The pins of connector I2C#2 are in reverse order to those of connector I2C, which implies also reversed polarity'''}}. Pay attention to that when connecting a second IMU to the I2C#2 port.}} | ||
=== Flashing Firmware === | === Flashing Firmware === | ||
---- | ---- | ||
Follow the instructions for {{WARNING|v1.1 boards}} in the [[How to flash firmware]] manual. | Follow the instructions for {{WARNING|'''v1.1 boards'''}} in the [[How to flash firmware]] manual. | ||
[[File:Stom32-bgc-v110-flashing-w-usbttladapter-connections-01.jpg|450px]] | [[File:Stom32-bgc-v110-flashing-w-usbttladapter-connections-01.jpg|450px]] | ||
Revision as of 10:31, 23 February 2015
This page provides documentation for the STorM32-BGC boards sold by Witespy - Ready To Fly Quads.
Dos and Don'ts
Please read the tutorial's Dos and Don'ts.
The board is shipped without firmware, it hence needs first to be flashed (for instructions see below).
On the v1.1 board, the pins of the connector I2C#2 on the bottom side are in reverse order to those of connector I2C, which implies also reversed polarity. Pay attention to that when connecting a second IMU to the I2C#2 port. Fortunately, it is relatively easy to swap the pins on the connectors of the supplied IMU cables.
Shop Links
- v1.3 board: http://www.readytoflyquads.com/storm32-bgc-3-v1-3-axis-stm32-brushless-gimbal-controller
- v1.1 board: http://www.readytoflyquads.com/storm32-bgc-3-axis-stm32-brushless-gimbal-controller
Board Configuration
- board version: v1.1 or v1.3
- board color: blue
- motor drivers: TC4452 in DFN packages
- on-board MPU: yes
- on-board bluetooth module: no
- I2C plug type: picoblade (1.25mm JST)
- I2C#2 plug type: picoblade (1.25mm JST)
- pin headers: no
Included accessories:
- MPU module
- cable with connectors for MPU module
Points to note:
- the board comes without firmware
- pre-installed bluetooth module is available as option
Specifications
- supply voltage: 6 - 18 V or 2 - 4S
- motor current: max. 1.5 A per motor
Comment: This is not yet fully exploited, motors with resistances of 12 Ohm or larger have been tested to be well handled at 4S (see here, here), motors with 10 Ohm may be handled with care (see here and here). - board dimensions: 50 mm x 50 mm, 45 mm bolt to bolt, holes Ø3 mm
The v1.3 Board
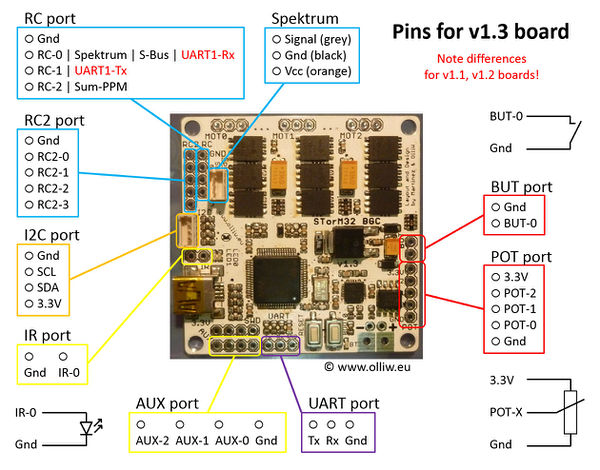
Pins and Connectors
Flashing Firmware
Follow the instructions for v1.3 boards in the How to flash firmware manual.
File:Stom32-bgc-v130-flashing-w-usbttladapter-connections-01.jpg
On-board Bluetooth
The witespy board can be equipped with a HC06 bluetooth module on the bottom side of the board.
For further info on the HC06 bluetooth module, and on its installation and configuration, see Bluetooth Module HC06.
The v1.1 Board
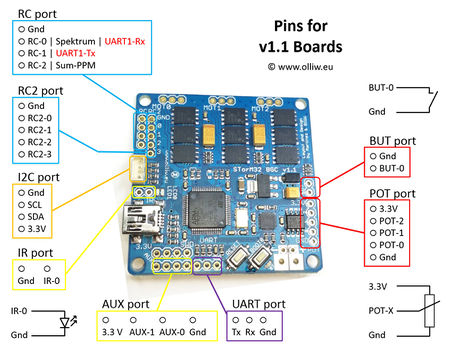
Pins and Connectors
Comment: The pins of connector I2C#2 are in reverse order to those of connector I2C, which implies also reversed polarity. Pay attention to that when connecting a second IMU to the I2C#2 port.
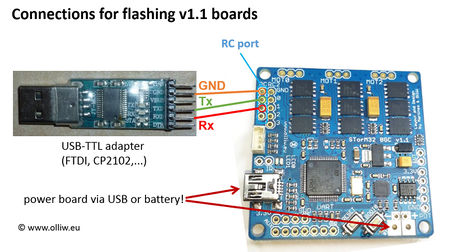
Flashing Firmware
Follow the instructions for v1.1 boards in the How to flash firmware manual.
On-board Bluetooth
The witespy board can be equipped with a HC06 bluetooth module on the bottom side of the board.
For further info on the HC06 bluetooth module, and on its installation and configuration, see Bluetooth Module HC06.
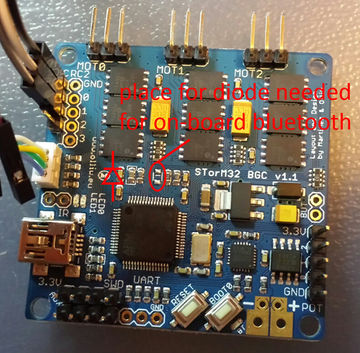
On v1.1 boards of an early batch, a diode, which is needed for the on-board bluetooth module to work, is not populated. Its location is shown in the photo below. In principle any diode which fits on the pads can be used, but preferably a Shottky diode is choosen. The "original" type is a 1PS76SB40. A possibly simpler solution is to just short circuit the two pads by e.g. soldering a piece of wire across them. However, the communication via the UART port wouldn't work then anymore.
Comment: When you don't need or use the UART port, you can simply jumper across the diode pads permanently with a piece of wire.


