Vor kurzem habe ich den Wechsel von Atmel’s AVR Mikrokontrollern auf ST’s STM32 Chips vollzogen. Die STM’s sind wirklich ganz nett und ich fange an sie zu mögen. Allerdings sind für sie viel weniger Informationen als für die AVRs im Netz verfügbar, und das was verfügbar ist, ist leider nicht immer direkt brauchbar. Ich habe mich daher entschlossen, einige Bruchstücke hier auf dieser Seite zu sammeln.
Das hier ist also kein „echtes“ Tutorial, sondern eine Sammlung von Infos welche ich als wichtig und/oder nützlich empfinde, aber so nicht direkt zu finden sind. Für Standardfragen, wie z.B. wie initialisiert und benutzt man die Ports, Zähler, ADCs, usw., reichen die verfügbaren Tutorials völlig aus (siehe letztes Kapitel unten), und ich sehe keinen Grund das zu duplizieren. Man braucht nur deren Beispielcodes zu kopieren&einfügen.
Übrigens, ich benutze Windows. Wann immer es also um plattformabhängige Dinge geht, bezieht sich das (nur) auf dieses Betriebssystem.
1. Entwicklungsboards
1.1. Blue Pill, 1.2. VL Discovery, 1.3. Goodluckbuy F103RC, 1.4. LC-Tech F103C8, 1.5. Maple Mini F103CB, 1.6. Olimex H103 F103RB
2. STM32 Mikroprozessor Details
2.1. F103T8, 2.2. F103CB, 2.3. F103RB, 2.4. F103RC/D/E
3. CooCox Toolchain
3.1. Installation, 3.2. Erstellen eines Projekts, 3.3. CoIDE Fallgruben
4. Code Snippets
5. STMFlashLoader
6. Externe Tutorials
1. Entwicklungsboards
Anders als im Arduino-Universum gibt es ein Mangel an netten und billigen STM32 Boards. Ich hätte mir gewünscht das es soetwas wie einen Arduino Nano für STM32 gibt, und für ähnlich wenig Geld (ja, es gibt den Maple Mini, aber…). Wie auch immer, hier nun meine „besten“ Funde. Das Olimex Board hätte ich mir normalerweise aufgrund des Preises nicht angeschafft, aber zu der Zeit hatte die Chinapost verrückt gespielt und ich war ungeduldig, also kaufte ich mir doch eines.
1.1. Blue Pill
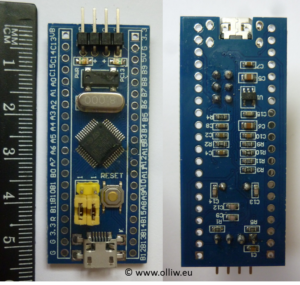
Das ist wohl DAS Board: Es hat alles was man braucht, die Pins sind beschriftet, es ist klein, und wirklich SUPER billig. Der einzige Nachteil ist vielleicht dass nur ein F103C8 Prozessor verbaut ist, aber auch der sollte für viele Zwecke ausreichend sein (und der F103C8 hat tatsächlich auch 128k wie der F103CB, siehe Post #11 und Folgende hier). Gute Infos zum Board sind auch hier zu finden.
Schaltplan
STM32duino: Blue Pill Scheme
Dimension
53 x 22 mm2
Hardware
STM32 F103 C8
8 MHz crystal + 32 kHz RTC crystal
Port Belegung
PC13: LED
PA11 – USB-DM: USB D-
PA12 – USB-DP: USB D+
Konfigurierbare Features
Es sind 2 Jumper vorhanden zum Konfigurieren von BOOT0, BOOT1.
1.2. STM32 VL Discovery
Es gibt mehrere Möglichkeiten die STM32 Chips mit einem Program zu flashen, aber als Anfänger wollte ich nicht lange rumexperimentieren. Daher habe ich mich für dieses Entwicklungsboard entschieden, da es die billigste Möglichkeit zu scheint an einen ST-Link/V2 zu kommen. Einen ST-Link/V2 wollte ich da die Vorgehensweise stark der ISP-Geschichte beim AVR ähnelt, und mir daher sehr vertraut erschien. Und tatsächlich, es hat damit einfach sofort funktioniert. Man braucht nur die ST-Link Utilities downloaden und installieren, und den entsprechenden USB Teiber auf der ST Webseite zu wählen.
- ST’s STM32 VL Discovery Webseite
- STM32F100RB Datenblatt
- ST’s ST-LINK/V2 Webseite (nach unten scrollen, dort findet sich alles was es braucht)
1.3. Goodluckbuy STM32F103RC Entwicklungsboard
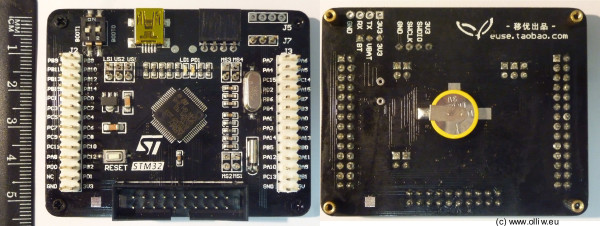
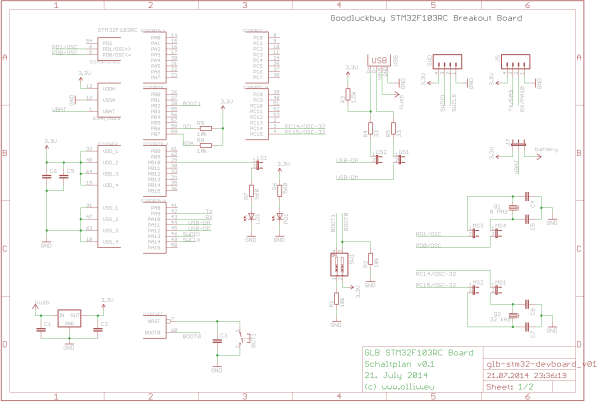
Das ist das einzige mir bisher bekannte günstige Board mit einem F103RC Prozessor, und es ist nicht schlecht: Es hat alles on-board was man braucht (inklusive einer 3 V Batterie) und die Pins sind beschriftet. Es ist allerdings nicht gerade sehr klein, dafür aber billig.
- Ich habe es bei GLB für $10.77 gekauft (inkl. Versand) (link).
Dimension
69 x 55 mm2
Hardware
STM32 F103 RC
8 MHz crystal + 32 kHz RTC cyrstal
Port Belegung
Alle Hardwarefeatures können individuell durch Jumper zu- bzw. abgegschaltet werden.
Konfigurierbare Features
Jumper MS3/MS4 – verbindet den 8Mhz Quarz und Kondensatoren mit
Jumper MS1/MS2 – verbindet den 32kHz Quarz und Kondensatoren mit PC14/PC15
Jumper US1/US2 – verbindet USB D+ und USB D- mit
Jumper LS1 – verbindet eine LED mit PB10
Jumper J7 – verbindet 3.3V oder die Batterie mit VBAT
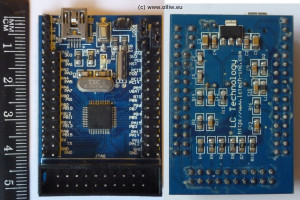
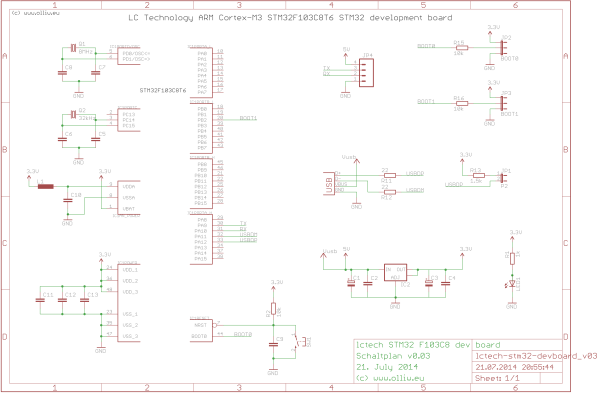
1.4. Shenzhen LC Technology STM32F103C8 Entwicklungsboard
Das ist ein sehr nettes Board, es gefällt mir gut: Es hat alles on-board was man braucht, die Pins sind beschriftet, und es ist relativ klein und wirklich billig. Der JTAG Anschluss liese sich absägen, womit das Board dann auch recht klein wird. Der einzige Nachteil ist vielleicht dass nur ein F103C8 Prozessor verbaut ist, aber auch der sollte für viele Zwecke ausreichend sein (und der F103C8 hat tatsächlich auch 128k wie der F103CB, siehe Post #11 und Folgende hier).
- Shenzhen LC Technology Webseite
- I bought it at ebay for $11.08 (e_goto), it is also available at BG for $5.68 ((link)), Aliexpress for $6.39 (link), GLB for $10.08 (link), DX for $12.63 (link), and several other sources – I’ve seen it even for below $5 (prices include shipping)
Dimension
52 x 36 mm2 (ohne USB Anschluss), Gewicht 14.3 g
Hardware
STM32 F103 C8
8 MHz crystal + 32 kHz RTC crystal
Port Belegung
PA11 – USB-DM: USB D-
PA12 – USB-DP: USB D+
Konfigurierbare Features
Jumper P2 – verbindet einen 1.5k Pullup-Widerstand mit USB D+
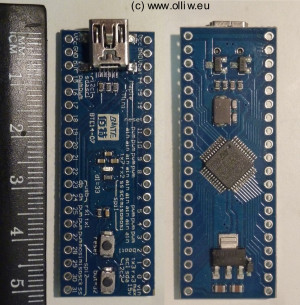
1.5. Maple Mini STM32F103CB Entwicklungsboard
Das ist ein weiters mir sehr gut gefallendes Board: Es bietet alles nötige, ist mit Abstand das kleinste Board, und zu einem lächerlichen Preis zu haben. Es wird ein F103CB Prozessor verwendet, der für viele Zwecke ausreichen sollte.
- Leaflabs Maple Mini Webseite
- It is available in many places, e.g. from aliexpress, I’ve seen it for even as little as $2
Schaltplan
https://github.com/leaflabs/maplemini/blob/master/maplemini.pdf
Dimension
51.6 x 18.8 mm2 (ohne USB Anschluss), Gewicht 4.2 g
Hardware
STM32 F103 CB
8 MHz crystal
Port Belegung
PA11 – USB-DM: USB D-
PA12 – USB-DP: USB D+
see also GPIO Information
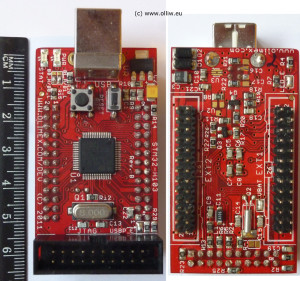
1.6. Olimex STM32-H103 STM32F103RB Entwicklungsboard
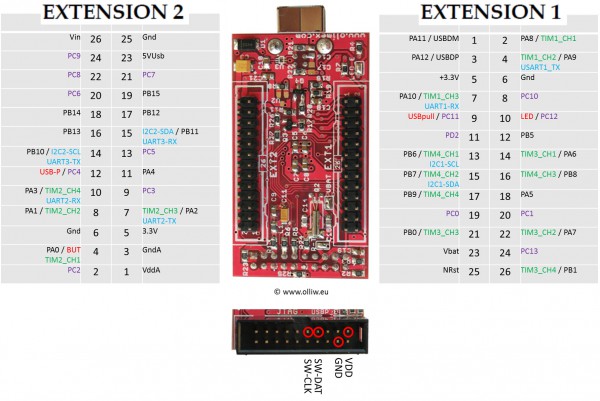
Das ist ein durchaus gelungenes Board. Aber: Es ist nicht wirklich billig, es verwendet einen riesigen USB Typ-B Anschluss, und die Pins sind nicht beschriftet. Letzteres macht die Benutzung ziemlich mühselig. Ich habe mir daher ein Blatt mit der Pinzuordnung erstellt, welches für mich unentbehrlich geworden ist, und welches Ihr unten findet.
Schaltplan
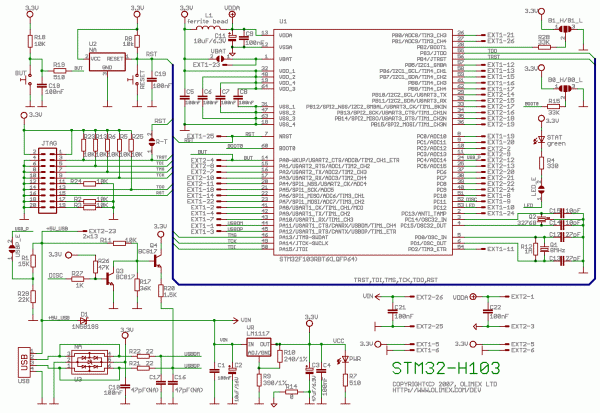 (by Olimex)
Pin Layout
Dimension
61 x 34 mm2
Hardware
STM32 F103 RB
8 MHz crystal + 32 kHz RTC crystal
Port Belegung
PA0 – BUT: ist über ein RC-Netzwerk mit einem Taster verbunden
PC12 – LED: ist über einen Lötjumper mit einer LED verbunden
PA11 – USB-DM: USB D-
PA12 – USB-DP: USB D+
PC11 – USB-DISC: verbunden mit einer Transitorschaltung, um D+ hoch/runter zu ziehen
PC4 – USB-P: ist über einen Lötjumper mit einem Spannungsteiler verbunden um die USB Spannung zu messen
Konfigurierbare Features
Es sind 6 Lötjumper vorhanden zum Konfigurieren von BOOT0, BOOT1, der Status-LED, USB Power, VBAT, und RESET.
2. STM32 Mikroprozessor Details
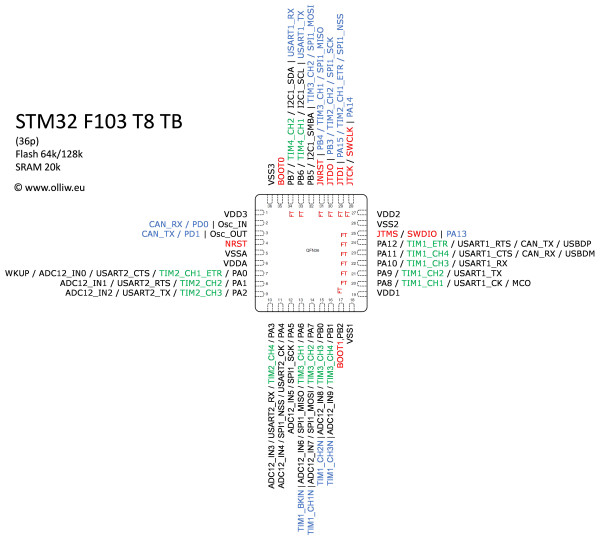
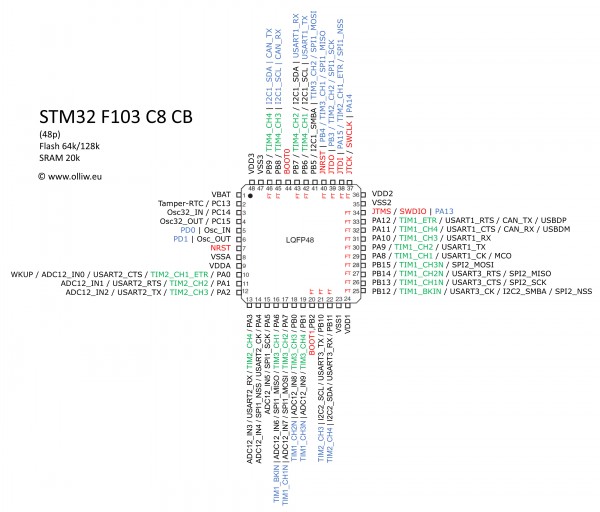
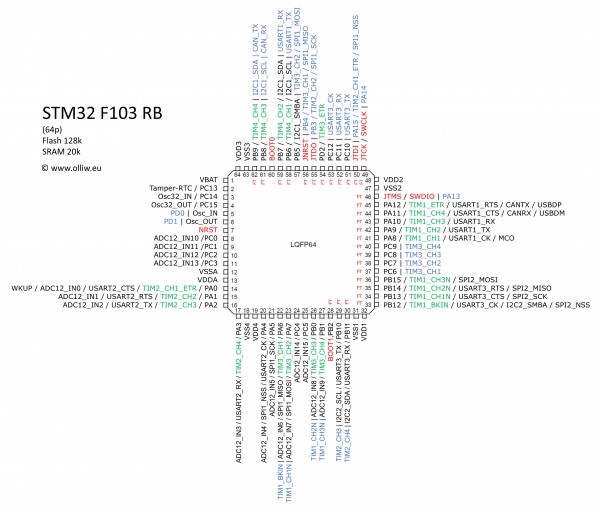
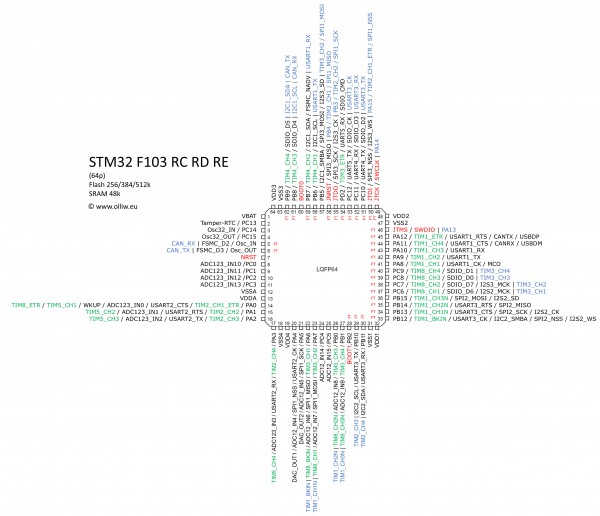
Am Anfang fand ich die Pinzuordnung bei den STM32 Chips ziemlich verwirrend, vorallem weil das Datenblatt nur eine Liste der Pins mit den Funktionen anbietet, und weil einige der Funktionen auf alternative Pins umgeleitet werden können. Zur besseren Übersicht erstellte ich mir daher einige Dokumente, die ich extrem nützlich finde, und daher unten zur Verfügung stelle.
Pin Eigenschaften
Bei den Pins unterscheide ich drei Kategorien: „Spezial“-Pins, 5V tolerante Pins, und „normale“ Pins.
Die Spezial-Pins sind für mich all diejenigen Pins welche normalerweise nicht verfügbar sind oder nicht benutzt werden würde, wie z.B. die Stromversorgungspins, Oszillatorpins, JTAG Pins, BOOT Pins, usw. Einge der übrigen Pins sind 5V tolerant, und sind durch ein FT in den Bildern unten gekennzeichnet. Die restlichen Pins bezeichne ich als normale Pins. Inspezieren der Datenblätter zeigt:
Faustregel: Pins, welche mit dem ADC verbunden sind, sind normale Pins; alle anderen GPIO Pins sind 5V tolerant.
Es gibt (wenige) Ausnahmen, wie z.B. Pin PB5, welcher nicht 5V tolerant ist.
Wenn einer der Spezial-Pins als GPIO Port benutzt werden soll, dann kann ich nur dringend empfehlen das Datenblatt genau zu studieren, denn oft habe diese andere Eigenschaften, wie z.B. das Pullup-Widerstände standardmässig eingeschaltet sind, usw.
STM32 F103 T8
72 MHz, Flash 128k, SRAM 20k, 36 pins
medium density performance line
Datenblatt, Referenzmanual, Cortex-M3 Programmiermanual
STM32 F103 CB
72 MHz, Flash 128k, SRAM 20k, 48 pins
medium density performance line
Datenblatt, Referenzmanual, Cortex-M3 Programmiermanual
STM32 F103 RB
72 MHz, Flash 128k, SRAM 20k, 64 pins
medium density performance line
Datenblatt, Referenzmanual, Cortex-M3 Programmiermanual
STM32 F103 RC (RD RE)
72 MHz, Flash 256k, SRAM 48k, 64 pins
high density performance line
Zusatzfunktionen: Tim8 (advanced), Tim5 (general), Tim6,7 (basic), Uart4,5, DAC
Datenblatt, Referenzmanual, Cortex-M3 Programmiermanual
3. CooCox Toolchain
Clearly, the STM32 world is not yet as easily accessible to hobbiests as the AVR world, but things become better, and this is to a large extend due to the CooCox project. The main part of CooCox is CoIDE, a fully integrated IDE based on arm-gcc and Eclipse.
I researched the other possibilities to set up a toolchain for STM32, but – for Windows users like me – they all look like a pain in the ass, and most of them are not free (or limited in possibilities). So, I am thankful to the CooCox project. The IDE has however its little flaws, but one gets used to them and working with the IDE goes smooth.
3.1. Installation
The installation of CooCox is fairly simple and fairly well described on the CooCox web page, and the two tutorials by Tech with Dave and Mikrocontroller listed in the tutorials chapter below. It’s obvious what to do: Download and install the ST-Link/V2 utility and USB driver, arm-gcc zip, and CoCenter. For the latter one has to register leaving an email address, but – well – that’s the price one has to pay for it. CoCenter allows to install all packages provided by CooCox; I did install only CoIDE, the other stuff is not needed (you can install them at any time later).
-
Get first your programmer running, for a ST-Link/V2 this means:
Go to the ST-LINK/V2 web page, scroll down and download the ST-LINK/V2 utility (STSW-LINK004) and required Windows USB driver (STSW-LINK003 or STSW-LINK006), unzip the .zip files (important!) and run the .exe files to install (just press always yes or next, and give it some time). There should be now a link to the program „STM32 ST-LINK Utility“ on your desktop. Note: You might be asked to restart the computer the first time you connect the ST-Link to it. So, it could be convenient to plug in (and out) the ST-Link now. - Go to the ARM-GCC web page and download the windows installer gcc-arm-none-eabi-xx-xxxxxx-xxxxxxxx-win32.exe, where the xx stand for the latest version number (e.g. 4_7-2013q3-20130916), and run the installer. On the last screen click the item „Add path to environment variable“, and then the „Finish“ button. During installation some windows pop up and close, but one cmd window will stay open at the end; you may close it.
- Go to the CoIDE web page, scroll down and click on „Download through CoCenter (Recommend)“, register, download, and run the .exe file to install. There should be now a link to the program „CoCenter“ on your desktop.
- Run CoCenter and first download and then install CoIDE. There should be now a link to the program „CoCenter“ on your desktop. Note: CoIDE doesn’t allow installation paths with e.g. blanks. Note2: CoCenter may terminate with a web browser error because of an incorrect web page link after a download; just rerun CoCenter and it will work. Note3: On one computer CoCenter terminated with a „CooCox Software Manager“ not working error, also downloading the CoIDE installer directly didn’t work, I couldn’t get things to work on this PC.
- Run CoIDE and set it up for the compiler as described on CooCox‘ Compiler Setting web page; for that just follow the screen shots by pressing the „Next >>“ button. Note: The tool chain path you have to select could read e.g. „C:\Program Files\GNU Tools ARM Embedded\4.7 2013q3\bin“, don’t get confused by the CooCox instructions, and don’t get confused by the fact that there is a „arm-none-eabi“ subfolder, it’s not the one you want to select.
- Go to CoIDE’s „Configuration“ tab, and double-check that in the „Options“ tab the „Adapter“ and „Port“ fields are set to ST-Link and SWD (if your programer is a ST-Link/V2).
3.2. Setting up a Project
CooCox provides a step-to-step description of how to set up a project (see the Quick Start web page), but I quickly „developed“ my own routine. The Quick Start tutorial is fine, but it doesn’t serve my needs. CooCox doesn’t memorize many of the „standard“ settings, so one has to go through every little bit and piece every time one creates a new project. Hopefully this will eventually improve.
- Go to the menu option „Project“->“New Project“, which opens the „New Project“ dialog window.
- Uncheck the item „Use default path“.
- Select the „Project Path“ and „Project Name“ entries, and press the „Next“ button (for my arrangement see below). Note: CoIDE doesn’t seem to „understand“ Windows; in the file browser dialog you don’t see the folders as shown in the explorer. In the browser, go to your user name, double click, and you should find your „My Documents“ folder.
- On the next screen move the mouse to the „Chip“ bubble, and press „Next“.
- On the next screen, scroll down to ST, double click, select the desired STM32 line, double click, select the desired STM32 chip, and double click. Press the „Finish“ button.
- Go now to the „Repository“ view, and select the required components. At minimum you need to click RCC (which automatically selects CMSIS core and CMSIS_Boot, which is all you need from the COMMON and BOOT areas), GPIO, and probably MISC (don’t confuse it with Misc). In the „Project“ view you can see how checking/unchecking a component in the „Repository“ view adds/removes the corresponding .c and .h files. Also a main.c is generated. I don’t use it and will remove it from the project.
These are the basic steps, but you most likely also want to do the next steps:
-
Go to the „Configuration“ view and there to „Compile“, and select Optimize Size (-Os) in the „Optimization“ field. The next time you do a build this will generate two errors, such as „… Error: registers may not be the same — `strexb r0,r0,[r1]'“. Go to the „Project“ view and open the file core_cm3.c, scroll down to the function indicated by the error, e.g. if the error says „strexb“ then find function
uint32_t __STREXB(uint8_t value, uint8_t *addr), and add a „&“ as shown here:
uint32_t __STREXB(uint8_t value, uint8_t *addr)

{

   uint32_t result=0;


   __ASM volatile ("strexb %0, %2, [%1]" : "=&r" (result) : "r" (addr), "r" (value) );

   return(result);

}
Repeat this for the other errors. This will correct the errors. Note: The CooCox team has repeatedly said that this has been corrected, but as of 17.Oct.2013 it is not. -
In the „Configuration“ view go to the „Compile“ tab, and enter „-std=gnu99;“ (wo the quotation marks) in the „Misc Controls“ field. This enables C99 programing things, such as
for(uint16_t i=0;i<1;i++){}. -
In the "Configuration" view go to the "Compile" tab, and enter "-lm;" (wo the quotation marks) in the "Misc Controls" field, and do the same in the "Link" tab. This enables using
#include <math.h>. -
The command to generate a .lss file is arm-none-eabi-objdump.exe -h -S %1.elf > %1.lss, where %1 is the output file name. One way to always get it, is to produce a file gcc2.lss.bat, with the content
@echo off

arm-none-eabi-objdump.exe -h -S %1.elf > %1.lss
and to place it in the tool chain path (see step 5.). Then, in CoIDE go to "Configuration"->"User"->"After Build/Rebuild" and enter "gcc2lss.bat ${output.path}\Debug\bin\${output.name}" in one of the run fields, and check it.
Comment: Some literature states that CooCox sets clocks incorrectly in standard situations, and that the function SystemInit() needs to be called in main(). Both points are NOT valid anymore (at least from CooCox 1.7.4 on, and F10x devices). CoIDE now assumes that for all STM32 devices, except of the connectivity line, an external 8 MHz crystal is used, and sets clocks accordingly (see system_stm32f10x.c). Also, CooCox's startup code calls first SystemInit() and then main(), which means that then main() starts the startup code has been executed (see startup_stm32f10x_md.c).
One nasty thing, at least then you're coming from AVR Studio, is that for each project quite many .c and .h files have to be handled. The CMSIS/SPL and other libraries are quite handy and make life easy - once they're set up - but they come with many files, and usually quite some of them have to be modified according to your specific needs. Now, the point is, most of my projects I want to run on different hardware, with e.g. different STM32 controllers, but for each of them one has to set up an individual project. So, in order to avoid that one has to copy all self-written files to each project folder, which would result in many duplicates and would make maintenance difficult, I create a folder with the project name, e.g. "HelloWorld", and then place the individual (sub)projects for each hardware in subfolders named e.g. "F103RB". Any additional (non-CMSIS/SPL) library files, such as the CPAL or USB-FS library files, are placed into folders at the same level (and not in a subfolder to e.g. "F103RB"). My steps are as follows:
-
Do steps 1. to 5. as described before, but in step 2. chose the entries
Project Name: HelloWorld-F103RB
Project Path: ...\Documents\STM32\HelloWorld\F103RB
Here the folder "STM32" is the major folder in which I hold all STM32 projects. - In CoIDE I remove "main.c" from the project (I don't find it smart to have thousand files with the same name but different content on the computer).
- Using windows explorer I create a file "helloworld.c", which holds the main() function, and place it in the folder "HelloWorld". I also create folders for the other libraries, e.g. for CPAL the folder "STM32_CPAL_Driver", and copy the library files into them.
- In CoIDE's "Project" view I create a group "STM32_CPAL_Driver", and add the library files.
- In CoIDE's "Project" view I add the file "helloworld.c" as well as all other self-written files needed for the project.
- I usually do but should not forget the above steps 6. and 7.
In order to create a subproject for another chip, e.g. the F103C8, one would repeat these steps. However, the project name and folder would e.g. be "HelloWorld-F103C8" and "...\STM32\HelloWorld\F103C8", and one would not have to copy the additional library files and self-written files gain (one though has to add them to the project in CoIDE). Hence, there are now individual projects hold in the respective subfolders, but they all use the same self-written files. So far that's the best structure I could come up with.
3.3. CoIDE Pitfalls
under construction...
4. Code Snippets
under construction...
5. STMFlashLoader
Das mit dem ST/Link funktioniert einwandfrei, für manche Projekte ist es jedoch praktischer den internen Bootloader, welcher in jedem STM32 vorinstalliert ist und über UART1 angesprochen werden kann, zu benutzen (AN2606). Es ist einfach wahrscheinlich das Leute einen USB-TTL Adapter irgendwo rumfliegen haben, und ein USB-TTL Adapter ist unglaublich billig, und sowiso ein nützliches Teil.
Glücklicherweise ist das vom Bootloader verwendete Protokol sehr gut dokumentiert (AN3155), und ST bietet das GUI Program Flash Bootloader Demonstrator, nützliche .dll Dateien, und das Komandozeilen-Interface (CLI) STMFlashLoader.exe an. Die GUI funktioniert, und die Benutzung ist gut dokumentiert (UM0462 und google). Sie ist nicht fancy, aber sie tut's.
Zum CLI Programm STMFlashLoader.exe gibt es allerdings einiges zu sagen. Ein CLI ist oft nützlich, z.B. für Batchprogramme, und verschiedene Leute haben, offensichtlich weil sie mit ST's CLI unzufrieden waren, ihre eigenen CLI Programme geschrieben (z.B. afrodevices, stm32flash, stm32loader, Sloadhost.exe). Zuerst hatte ich den STMFlashLoader ausprobiert, aber ohne Erfolg, und so versuchte ich es mit zwei der Alternativen, wurde mit denen aber auch nicht glücklich. Also habe ich es wieder mit dem STMFlashLoader versucht, und festgestellt, dass in der Kommandozeile eine Map-Datei mit dem Befehl -i angegeben werden muss. Für z.B. das VLDiscovery sähe eine funktionierende Kommandozeile so aus:
"path/stmflashloader.exe" -c --pn 3 --br 115200 -i stm32_med-density-value_128k.STmap -e --all -d --fn "test.hex" --v -r --a 8000000
Das fand ich nun sehr seltsam, dass die CLI ein Map-Datei benötigt während die GUI nichts deratiges braucht und sich die Infos irgendwie selber beschaffen kann. Ich fand das mit dem Map-File zudem auch ziemlich unpraktisch. Also habe ich versucht herauszufinden wie die GUI das macht. Unglücklicherweise ist der Source-Code der GUI nicht verfügbar, und es war forschen angesagt. Glücklicherweise sind jedoch die Sourcen der .dll Dateien verfügbar, in welchen sich eine nützliche Funktion zur Ermittelung der Flashgröße fand, und die Konfigurationsdateien verrieten die Speicheradresse an der sich die Flashgröße befindet. Et voila, und schon funktionierte es. Blöd bei der originalen CLI ist auch, das es keine Option ähnlich dem "erase required pages" der GUI gibt. Also wurde auch das noch mit eingebaut.
Der modifizierte Flashloader, STMFlashLoaderOlliW.exe, sowie die Sourcen sind unten als .zip Datei zu finden. Dieser Loader bietet die zusätzliche Option -ow, welche anstelle von -i benutzt werden kann und die Device-abhängigen Parameter automatisch ermittelt, sowie den Parameter --ep, mit welchem die nötigen Seiten vor einem Flash gelöscht werden können. Eine funktionierende Kommandozeile könnte dann so aussehen:
"path/stmflashloaderolliw.exe" -c --pn 3 --br 115200 -ow -d --fn "test.hex" --ep --v -r --a 8000000
Ich habe die Gelegenheit beim Schopf gepackt, und habe die Ausgabe etwas informativer gestaltet und die "Press any key" Funktion verbessert.
Eine Bemerkung: Ich besitze natürlich nicht von jedem STM32 Typen ein Exemplar und konnte den Code nicht für jeden Chip testen. Ich bin der Dokumentation so gut es ging gefolgt, und für die typischen STM32 Chips sollte er funktionieren, aber, wie gesagt...
Download: STMFlashLoaderOlliW [.zip] (3.8 MB)
Nützliche Dokumente
- AN2606: STM32™ microcontroller system memory boot mode
- AN3155: USART protocol used in the STM32™ bootloader
- STSW-MCU005: Flash Bootloader Demonstrator
- UM0462: STM32™ and STM8™ Flash loader demonstrator
6. Externe Tutorials
Wie schon erwähnt finden sich für die STM32s bei weitem nicht so viele Informationen auf dem Netz wie für die AVRs. Einige Tutorials gibt es allerdings doch, und für den Start waren die auch sehr hilfreich.
-
STM32 Artikel auf www.mikrocontroller.net
(nicht in Allem up-to-date aber trotzdem die erste Referenz) -
STM32 Tutorial von Diller Technologies
(war am Anfang meine wichtigste Quelle, DANKE Diller!) -
Hello World tutorial for STM32 Discovery boards using CooCox CoIDE and GCC ARM von Tech with Dave
(hier wegen der nützlichen Installationsanleitungen für armgcc, COIde, und ST-Link gelistet) -
Installation der Toolchain und erstes Projekt von Mikrocontroller
(eine weitere gute Beschreibung der Installation der Toolchain, zusammen mit den vorherigen Links klappt alles problemlos) - ARM Cortex Tutorials von embedds.com
- STM32 Clock Configuration von OliverBehr.de
-
Discovering the STM32 Microcontroller von Geoffrey Brown
(das ist ein Buch; nützlich, aber nicht so nützlich wie man es sich hoffen würde, die Beispiele sind doch sehr spezifisch)

Pingback: STM32F103 Mikrocontroller | Andreas' Blog
Pingback: Seggers JLink | Andreas' Blog