Auf dieser Seite finden sich Tutorials zum Thema Flashen von Silabs-ESCs mittels owSilProg und was dazu gehört, wie das Windowsprogram BLHeliTool, die Programmierbox BLHeliBox, oder die Bluetooth-Erweiterung:
- Herstellen eines owSilProg-Programmers
- BLHeliTool: Flashen der BLHeli Firmware
- BLHeliTool: Konfigurieren der BLHeli Parameter
- Die Multiple-ESC Funktion
- Die BLHeliBox und ihre Bedienung
- BLHeliBox: Bauanleitungen
- Die Bluetooth-Erweiterung
Die Grundlagen von owSilProg, und den darauf aufbauenden Anwendungen BLHeliTool und BLHeliBox, sind hier beschrieben. Für ESCs mit Silabs Chips gibt es die Firmware BLHeli von Steffen Skaug alias sskaug (Danke für die tolle Arbeit!).
Warum owSilProg?
Der allereinfachste Weg einen Silabs Mikrokontroller zu flashen ist, sich alles Nötige, also den Silabs Toolstick oder einen der Clones, fertig zu kaufen (die zusätzlich benötigte Software gibt es kostenlos). Es kann trotzdem gute Gründe geben, owSilProg zu verwenden:
- Kontinuität: Ist man bereits ein AVR-„Jünger“ möchte man vielleicht nicht extra Silabs-Equipment anschaffen.
- Kosten: Billiger geht es zur Zeit kaum, insbesondere wenn man bereits über AVR-Equipment verfügt.
- Einfachheit: Wer drei Kabel anlöten kann, für den ist dieses Projekt ein Kinderspiel. Nur kaufen ist einfacher…
- Funktionalität: Zugang zu Möglichkeiten die man sonst nicht hat, wie z.B. die BLHeliBox oder die Multiple-ESC-Funktion.
- Weiterverwendbarkeit: So ein Arduino-Board lässt sich auch noch für viele andere Zwecke benutzen.
- und X weitere Gründe… 😀
BLHeli
BLHeli unterstützt mittlerweile viele ESCs mit Silabs-Chip. Eine ausgezeichnete Informationsquelle, mit Links zu Bildern jeder ESC, ist die Google-Tabelle ESC specs for Simonk / BLHeli FW flash (Danke an TomSn0w und die Anderen für’s pflegen!). Bei Fragen zu BLHeli ist die erste Anlaufstelle Steffen’s Helifreak-Thread BLHeli for SiLabs ESCs. Vorher sollte man jedoch Steffen’s Anleitung BLHeli programming by TX SiLabs Rev10.x.pdf gelesen haben!
I. Herstellen eines owSilProg-Programmers
(Anleitung bezieht sich auf owSilProg Firmware-Paket Version v20130103 und jünger)
Der owSilProg-Programmer ist die zum Flashen von Silabs Mikrokontrollern benötigte Hardware. Er lässt sich wirklich ziemlich leicht selber herstellen. Es gibt unzählige DIY Möglichkeiten (z.B. so), aber es hat sich bewährt – da unschlagbar einfach – Arduino Boards zu benutzen.
Was wird benötigt
- ein beliebiges Arduino Board (mit USB Anschluss)
- drei Kabel
- die aktuelle Version des owSilProg Firmwarepakets
Gute Erfahrungen gibt es für den Arduino Nano, Arduino Uno, Arduino Mega 2560, und Arduino Duemilanove. Aber jedes Arduino Board oder Clone ist geeignet. Von den Multicopterleuten wurden sogar deren Flightcontroller (MultiWii, APM, …) erfolgreich zweckentfremdet. Für den permanenten Einsatz in Quadrocoptern ist der Cheapduino ziemlich genial.
Die meines Wissens bisher billigste Lösung ist ein Arduino Nano. Es gibt ihn bereits für unschlagbare $11 (inkl. Versand), siehe das Appendix. Sehr beliebt ist der Arduino Uno. Er kostet nur geringfügig mehr als der Nano (Appendix). Ein Vorteil wäre vielleicht, dass sich der Uno leicht durch aufstecken eines Arduino LCD-Keypad Shields günstig zu einer BLHeliBox aufrüsten lässt.
Was müsst Ihr wissen
Wenn Ihr einen der „üblichen“ Arduinos benutzt (Nano, Uno, Mega, Duemilanove), dann braucht Ihr nichts weiter zu wissen als welches Board Ihr habt.
Bei anderen Arduino Boards werden der Prozessortyp (z.B. Atmega168, Atmega328p, Atmega2560, usw.), die Taktfrequenz (8 MHz oder 16 MHz), und die Baudrate des aufgespielten Bootloaders (19200 bps, 57600 bps oder 115200 bps) benötigt. Der Prozessortyp und die Taktfrequenz sollten sich aus der Beschreibung des Arduino-Boards eindeutig ergeben. Die Baudrate kann der Datei boards.txt entnommen werden. Ihr könnt jedoch auch einfach die drei Möglichkeiten 19200, 57600, oder 115200 bps ausprobieren.
Was ist zu tun
- Herunterladen der owSilProg Zip-Datei von hier. Diese Datei enthält alles an Firmware/Software was benötigt wird.
- Entpacken der Zip-Datei in ein Verzeichnis eigener Wahl. Ich nenne das Verzeichnis jetzt einfach mal C:\owSilProg. Weitere Installationen (von z.B. Treibern) sind normalerweise nicht nötig.
-
Starten des Windows-Programms AvrBurnTool_vxxx.exe (es befindet sich im Verzeichnis C:\owSilProg). Es öffnet sich folgendes Fenster:
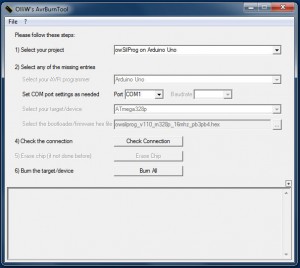
- Setzen des Eintrags im Feld ‚1) Select your project‘: Das Dropdown-Feld bietet verschiedene Optionen an. Wähle eine der ‚owSilProg‘ Optionen entsprechend deines Arduino Boards aus (also z.B. ‚owSilProg on Arduino Uno‘ bei einem Uno). Ist dein Board nicht in der Liste, wähle bitte ‚owSilProg using other Arduino‘.
- Setzen der Einträge im Feld ‚2) Select any of the missing entries‘: Bei den üblichen Arduino Boards ist nur der Eintrag im Feld ‚Port‘ zu setzen. Das Folgende dann bitte überspringen und gleich zum nächsten Schritt weitergehen! Ansonsten ist im Feld ‚Select your AVR programmer‘ eine der Optionen ‚Arduino @ 19200bps‘, ‚Arduino @ 57600bps‘, oder ‚Arduino @ 115200bps‘ entsprechend der Baudrate einzustellen, und im Feld ‚Select your target/device‘ der passende Prozessortyp zu setzen. Zuletzt ist im Feld ‚Select the bootloader/firmware hex file‘ die passende owSilProg Hex-Datei entsprechend des Prozessortyps, der Taktfrequenz, und den gewünschten Pins für die Programmierleitungen C2CK und C2D auszuwählen.
-
Setzen des Eintrags im Feld ‚Port‘: Hier wird die USB-Schnittstelle (bzw. der damit verbundene virtuelle COM Port) eingestellt, an die das Arduino Board angeschlossen ist. Das Dropdown-Feld listet die aktuell vorhandenen Ports auf. Der richtige Port lässt sich wie folgt finden:
– Arduino ist nicht mit dem PC verbunden: Anklicken des Pfeil-Buttons und die aufgelisteten COM Ports merken.
– Arduino Board mit einem USB Kabel mit den PC verbinden, und warten bis das Gerät gefunden wurde.
– Nun erneut den Pfeil-Button anklicken und die Liste der aktuellen COM Ports aufrufen. Den neu hinzu gekommenen COM Port auswählen. -
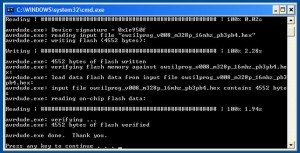
Brennen der owSilProg Firmware ‚6) Burn the target/device‘: Durch drücken des Buttons Burn All wird der eigentliche Brennvorgang gestartet. Im Statusfenster von AvrBurnTool erscheinen Meldungen. Zudem öffnet sich ein neues Fenster, in welchem das Program Avrdude abläuft. Einfach abwarten bis die Meldung press any key to continue… erscheint. Wenn alles geklappt hat sieht das Fenster so aus (für das Beispiel eines Arduino Nano):
-
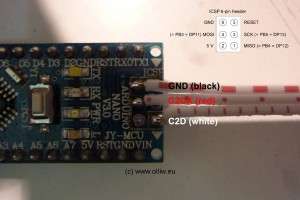
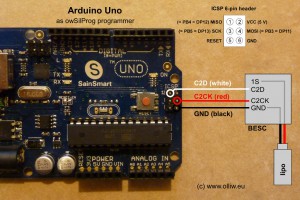
Anlöten dreier Kabel an das Arduino Board: Zum Schluss werden drei Kabel, welche zu den Programmieranschlüssen GND (schwarz), C2CK (rot) und C2D (weiss) der Silabs-BESC geführt werden, an die entsprechenden Pins am Arduino Board angelötet (um die Multiple-ESC-Funktion zu nutzen, werden weitere Anschlüsse benötigt, siehe Kapitel IV). Welche Pins C2CK und C2D entsprechen ergibt sich aus dem Dateinamen der owSilProg Hex-Datei; der Zusatz „pb3pb4“ bedeutet z.B. das es PB3 und PB4 sind. Bei den „kleinen“ und „normalen“ Arduino Boards sind die (ATmega) Pins PB3 und PB4 elektrisch identisch mit den (Arduino) digital pins D11 und D12, aber auch mit den Anschlüssen MOSI und MISO des ISP-Steckers auf dem Arduino-Board. Es gilt also die Zuordnung:
Arduino Nano, Uno, Mini, Pro Mini, Duemilanove, usw.:
pb3pb4: PB3 = digital D11 = MOSI → C2CK = rot, PB4 = digital D12 = MISO → C2D = weiss
Meistens wird es am praktischten sein, die GND/MOSI/MISO Pins am ISP-Anschluss zu nutzen und die drei Kabel dort anzubringen. Für einen Arduino Nano (links) und Arduino Uno (rechts) sieht das dann z.B. so aus:
Bei Mega-Boards ist es günstig die Pins PB2 und PB3 (digital D51/D50) zu benutzen, da diese nun MOSI und MISO entsprechen. Bei Verwendung der owSilProg-Datei mit dem Zusatz „pb2pb3“ können also auch bei den Mega-Boards die C2CK und C2D Leitungen genau wie eben an den MOSI/MISO Pins des ISP-Steckers angeschlossen werden. Beim ArduFlyer apm2.5 Board werden PF1 und PF0 benutzt (siehe hier). - Herzlicher Glückwunsch… das war’s schon!
Als Beispiele wurden der Arduino Nano und Uno betrachtet, aber die Anleitung gilt natürlich, mit den entsprechenden Änderungen bzgl. der Feldeinträge und den Pins für die drei Kabel, genauso auch für andere Arduino Boards.
Wenn für eueren Mikrokontroller und/oder eure Pinbelegung die passende owSilProg Hex-Datei fehlen sollte, dann scheut euch bitte nicht mich zu kontaktieren. Im Regelfall ist es ein leichtes ein geeignetes Hex zu erstellen!
FAQ
-
Kann der Arduino nach dem Flashen mit owSilProg weiter benuzt werden bzw. bleibt der Arduino Bootloader intakt?
Ja. Der Bootloader bleibt intakt und der Arduino kann nach dem Flashen mit owSilProg weiterhin mit neuen Sketches geladen werden, genauso wie zuvor auch.
Fehlerbehebung
- Beim erstmaligen verbinden des Arduino-Boards mit dem PC muss manchmal ein Treiber installiert werden. Die Arduino Treiber sind ab Version v20120921 dem owSilProg Firmwarepacket beigefügt und im Unterverzeichnis ~/arduino-1.0.1/drivers/ zu finden. Eine Anleitung zum Installieren des Treibers ist z.B. Arduino UNO Windows 7 USB driver installation.
- Der Name des Verzeichnisses, in dem sich die Bootloader/Firmware-Hex-Datei befindet, darf KEINE Leerzeichen enthalten! Avrdude kann damit nicht umgehen und wird mit einem Fehler abbrechen.
- Bei älteren Arduino Boards muss evtl. in Schritt 7 der Reset-Knopf kurz gedrückt werden (da sie die Autoreset-Funktion noch nicht haben).
- In manchen Fällen wird anscheinend die Datei libusb0.dll (oder libusb0_x64.dll) benötigt. Ab Version v20130103 ist sie dem owSilProg Firmwarepacket beigefügt, und es sollten sich eigentlcih keine Probleme ergeben.
- In frühen Versionen waren die C2CK/C2D Anschlüsse auf die Pins PD2=D2/PD3=D3 gelegt, und dies ist in manchen Anleitungen/Abbildungen im Web immer noch so angegeben. Lasst euch davon nicht verwirren. Die richtigen Pins ergeben sind aus dem Dateinamen der owSilProg Hex-Datei! (und wenn nicht, dann benutzt Ihr eine veraltete Version)
II. BLHeliTool: Flashen der BLHeli Firmware
(Anleitung bezieht sich auf owSilProg Firmware Version v20130103 bzw. BLHeliTool v1.00, und jünger)
Was wird benötigt
- ein owSilProg Programmer
- die aktuelle Version des owSilProg Firmwarepakets bzw. der BLHeliTool Dateien (.exe, .ini, .dev)
- ein BESC mit Silabs Chip
Was müsst Ihr wissen
Für das folgende solltet Ihr wissen, wo sich die Anschlussstellen für die drei Programmierleitungen GND, C2CK, und C2D bei eurem BESC befinden. Die IMHO beste Informationsquelle dazu ist Steffen’s Pdf-Datei BLHeli supported SiLabs ESCs.pdf. Darüber hinaus solltet ihr wissen, wie ihr die drei entsprechenden Kabel vom owSilProg-Programmer mit den Anschlussstellen am BESC verbinden wollt. Die Antwort hängt sehr vom gegebenen Fall ab. Bitte konsultiert die entsprechenden Threads/Dokumente, oder fragt in den Threads einfach nach.
Zur Kennzeichnung der Leitungen und Anschlussstellen hat sich folgende Farbkodierung eingebürgert:
GND = schwarz C2CK = rot C2D = weiss
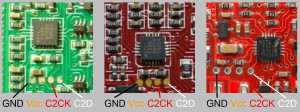
Tip: Wenn ihr vier Pads in einer Reihe in der Nähe des Silabs Chips seht, was für viele BESCs gilt, dann könnt ihr darauf wetten, dass die Reihenfolge GND, Vcc, C2CK, C2D ist. Einige Beispiele sind im Bild gezeigt. Welches das GND-Pad ist kann leicht aus dem Platinenlayout bestimmt werden, oder durch „durchklingeln“ mit einem Multimeter.
Was ist zu tun
-
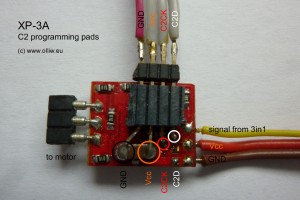
Herstellen der Verbindung zwischen owSilProg Programmer und BESC: Was hier zu tun ist hängt von euren Gegebenheiten ab. Meistens wird man die drei GND, C2CK, und C2D Kabel an die ensprechenden Pads auf dem BESC-Board anlöten, oder sich einen geeigneten Stecker bauen. Das könnte z.B. so aussehen:
- Herstellen der Verbindung zwischen owSilProg Programmer und PC: Den owSilProg Programmer mit einem USB Kabel mit den PC verbinden.
- BESC mit Batterie verbinden: Die Stromversorgung der BESC hängt von eurem speziellen Fall ab; in den meisten Fällen wird sie einfach durch Einstecken der Batterie hergestellt.
-
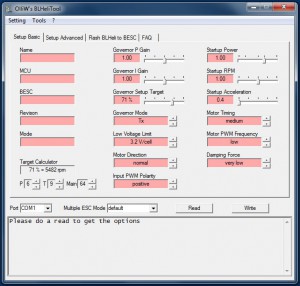
Starten des Windows-Programms BLHeliTool_vxxx.exe: Das Program befindet sich im Verzeichnis, in dem Ihr owSilProg entpackt habt. Es öffnet sich folgendes (oder ein ähnliches) Fenster:
-
Setzen des Eintrags im Feld ‚Port‘: Hier wird die USB-Schnittstelle (bzw. der damit verbundene virtuelle COM Port) eingestellt, an die das Arduino Board angeschlossen wird. Das Dropdown-Feld listet die aktuell vorhanden Ports auf. Der richtige Port lässt sich wie folgt finden:
– Arduino ist nicht mit dem PC verbunden: Anklicken des Pfeil-Buttons und die aufgelisteten COM Ports merken.
– Arduino Board mit einem USB Kabel mit den PC verbinden, und warten bis das Gerät gefunden wurde.
– Nun erneut den Pfeil-Button anklicken und die Liste der aktuellen COM Ports aufrufen. Den neu hinzu gekommenen COM Port auswählen. - Setzen des Eintrags im Feld ‚Multiple ESC Mode‘: Wenn du mit der Multiple-ESC Funktion nicht vertraut bist, dann wähle bitte ‚default‘. Für Infos zur Multiple-ESC Funktion bitte Kapitel IV zu Rate ziehen.
-
Wechseln zum Tab ‚Flash BLHeli to BESC‘: Das BLHeliTool-Fenster sieht dann so (oder so ähnlich) aus:
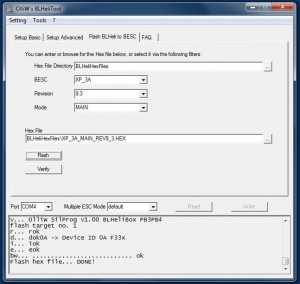
- Wahl der Hex-Datei mit der gewünschten BLHeli Firmware: Die passende Hex-Datei kann am einfachsten mit den Filtern bestimmt werden. Dazu zunächst im Feld Hex File Directory das Verzeichnis angeben, in dem sich die BLHeli Hex-Dateien befinden. Normalerweise ist das BLHeliHexFiles, wie voreingestellt. Dann mit den drei Dropdown-Feldern den BESC, die Revision, und den Mode (Main, Tail, Multi) auswählen. Die gewählte Hex-Datei wird jeweils im Feld Hex File angezeigt. Soll eine Hex-Datei geflasht werden, die nicht über die Filter erreicht wird, dann den Namen in das Feld Hex File eingeben oder auf den ‚…‘ Button drücken und zur Datei browsen.
- Flashen der BLHeli Firmware: Mit drücken des Buttons Flash wird der eigentliche Flashvorgang gestartet. Im Statusfenster von BLHeliTool erscheinen Meldungen. Einfach abwarten bis die Meldung Flash hex file…. DONE! erscheint – oder eine Fehlermeldung, falls etwas nicht geklappt hat.
- Herzlicher Glückwunsch… das war’s schon!
FAQ
-
Ist es möglich die ursprüngliche Firmware wieder herzustellen?
Nein. Das Flashen mit BLHeli kann nicht rückgängig gemacht werden (im Prinzip ist es zwar möglich die alte Firmware wieder zu flashen, nur ist diese normalerweise vorm Auslesen geschützt und daher nicht verfügbar).
Fehlerbehebung
- Wenn ein Fehler auftritt, dann den Vorgang – als erste Maßnahme – bitte einfach ein oder zweimal wiederholen. Manchmal löst das das Problem bereits.
- ‚v… Connection to owSilProg programmer FAILED!‘: Dieser Fehler zeigt an, dass die USB-Verbindung über den COM Port zwischen PC und owSilProg Programmer nicht funktioniert. In 99.99% der Fälle liegt das nicht an owSilProg/BLHeliTool/BLHeliBox, sondern an falschen COM Port, fehlende Windows Treiber, usw.
- ‚d… Connection to target FAILED!‘: Dieser Fehler zeigt an, dass die Verbindung zwischen owSilProg Programmer und BESC nicht funktioniert. In 99% der Fälle liegt das nicht an owSilProg/BLHeliTool/BLHeliBox, sondern an einer falschen oder schlechten Verbindung zwischen owSilProg Programmer und BESC! Auch wenn zunächst geglaubt wurde alles richtig gemacht zu haben, hat sich nachträglich bisher eigentlich immer gezeigt, dass es doch an einer falschen oder schlechten Verbindung lag!
- ‚d… MCU INCORRECT or connection to target FAILED!‘: Dieser Fehler zeigt an, dass ein bisher von BLHeli nicht unterstützer Silabs Chips im BESC verwendet wird, oder dass die Verbindung zwischen owSilProg Programmer und BESC nicht zuverlässig funktioniert, ähnlich zum vorhergehende Fehler. Im ersten Fall (falsche MCU) bitte in einem der Threads Nachricht geben. Die möglichen Gründe für den zweiten Fall (schlechte Verbindung) sind vielfältiger als beim vorhergehenden Fehler, und können z.B. auch an speziellen Details der Hardware des „Arduino“ Boards/Clones liegen.
- ‚e… Device erase FAILED!‘: Dieser Fehler sollte nicht auftretten, tritt jedoch (leider) trotzdem in wenigen Fällen auf. Wenn es nicht an einem „trivialen“ Problem liegt, typisch sind z.B. schwache Lipos, dann bitte in einem der Threads Nachricht geben.
- ‚bw… Block write FAILED!‘: Dieser Fehler sollte nicht auftretten, tritt jedoch trotzdem manchmal auf. Wenn kein „triviales“ Problem vorliegt, typisch sind z.B. schwache Lipos, dann ist dies normalerweise ein Folgefehler, und zeigt eines der obigen Probleme an.
III. BLHeliTool: Konfigurieren der BLHeli Parameter
Zunächst folgt man der Anleitung für’s Flashen der BLHeli Firmware, bis zum 6. Schritt, also:
- Herstellen der Verbindung zwischen owSilProg Programmer und BESC
- Herstellen der Verbindung zwischen owSilProg Programmer und PC
- BESC mit Batterie verbinden
- Starten des Windows-Programms BLHeliTool_vxxx.exe
- Setzen des Eintrags im Feld Port
- Setzen des Eintrags im Feld Multiple ESC Mode
Lesen der Parameter: Die im BESC gespeicherten Parameterwerte können durch Drücken des Buttons Read eingelesen werden. Im Statusfenster von BLHeliTool erscheinen Meldungen. Einfach abwarten bis die Meldung Read… DONE! erscheint – oder eine Fehlermeldung, falls etwas nicht geklappt hat. Das Fenster zeigt nun alle verfügbaren Parameter mit den aktuellen Werten an, und sieht so (oder so ähnlich) aus: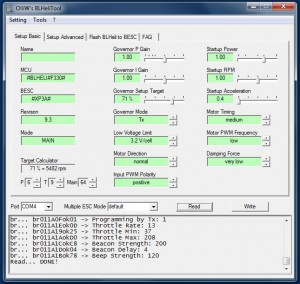
Schreiben der Parameter: Die im Fenster angezeigten Parameterwerte können durch Drücken des Buttons Write im BESC gespeichert werden. Im Statusfenster von BLHeliTool erscheinen Meldungen. Einfach abwarten bis die Meldung Write… DONE! erscheint – oder eine Fehlermeldung, falls etwas nicht geklappt hat.
Einstellen der Parameter: Die BLHeli Parameter sind auf die zwei Tabs ‚Setup Basic‘ und ‚Setup Advanced‘ aufgeteilt. BLHeli bietet sehr viele Parameter zum Einstellen an, und die Unterteilung führt (hoffentlich) zu einer besseren Übersicht. Die Bedeutung und Funktion der einzelnen Parameter werden in Steffen’s Anleitung BLHeli programming by TX SiLabs Rev9.x.pdf erklärt.
Fehlerbehebung
- Das Lesen und Schreiben der BLHeli-Parameter funktioniert natürlich nur dann, wenn zuvor eine BLHeli-Firmware, wie in Kapitel II beschrieben, geflasht worden ist.
IV. Die Multiple-ESC Funktion
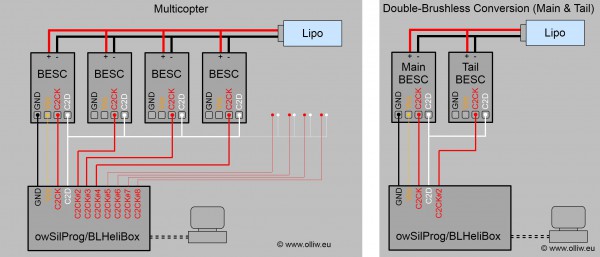
Seit dem Release v20130103 unterstützt owSilProg/BLHeliTool/BLHeliBox die sogenannte Multiple-ESC Funktion. Dies bedeutet, das nun bis zu 8 (!) BESCs gleichzeitig am owSilProg-Programmer oder der BLHeliBox angeschlossen und zusammen verwaltet werden können. In gewisser Weise hat man also acht, miteinander synchronisierte Programmer (welche ich mit Programmer #1, Programmer #2, …, Programmer #8 bezeichnen werde). Dies ermöglicht nützliche Funktionen für Multicopterpiloten, aber auch für double-brushless Umbauten (Haupt- und Heckmotor) von Microhelis.
Die BLHeliBox unterstützt die Multiple-ESC Funktion vollständig, aber der Einfachheit wegen werde ich sie bei der Beschreibung der Prinzipien nicht jedesmal miterwähnen, sondern mich auf das Pärchen owSilProg-Programmer und BLHeliTool beschränken.
Multicopter
Die Vorteile der Multiple-ESC Funktion ist für Multicopter am offensichtlichsten. Die installierten BESCs sollten alle identisch, also auch mit der selben Firmware geflasht worden sein. Darüberhinaus sollten alle Einstellungen der BLHeli-Parameter genau übereinstimmen. Mit einem normalen „Einzel-ESC“-Programmer muss dazu jeder Schritt für jede BESC einzeln durchgeführt und auf die Konsistenz der BESC-Parameter untereinander sorgfältig geachtet werden. Mit der Multiple-ESC Funktion wird dies erheblich vereinfacht: Alle BESCs werden an den owSilProg-Programmer angeschlossen, und BLHeliTool macht dann den Rest.
Konkret sprechen wir von den Operationen Flash, Verify, Read und Write. Ist im Feld Multiple ESC Mode eine der Multicopter-Einstellungen Bi Copter, Tri Copter, Quad Copter, Hexa Copter, oder Octo Copter eingestellt, dann macht BHeliTool folgendes:
Flash: Die angegebene Firmware (Hex-Datei) wird mit einem Klick auf den Flash Button in alle BESCs geflasht. Geflasht wird der Reihe nach, beginnend mit Programmer #1, gefolgt von Programmer #2, bis zum letzten Programmer entsprechend der Einstellung im Feld Multiple ESC Mode (bei Quad Copter bis zum Programmer #4).
Verify: Die angegebene Firmware (Hex-Datei) wird mit einem Klick auf den Verify Button für alle BESCs mit der in ihnen geflashten Firmware verglichen. Verglichen wird der Reihe nach, beginnend mit Programmer #1, gefolgt von Programmer #2, bis zum letzten Programmer entsprechend der Multiple ESC Mode Einstellung.
Read: Im Unterschied zu den anderen Operationen werden mit einem Klick auf den Read Button ausschliesslich die Parameter der an Programmer #1 angeschlossenen BESC ausgelesen.
Write: Die in den beiden Setup Tabs eingestellten Parameterwerte werden mit einem Klick auf den Read Button in alle BESCs geschrieben. Geschrieben wird der Reihe nach, beginnend mit Programmer #1, gefolgt von Programmer #2, bis zum letzten Programmer entsprechend der Multiple ESC Mode Einstellung. Der Name, der tatsächlich in eine BESC geschrieben wird, wird hierbei aus dem Eintrag im Feld Name durch Erweiterung mit ‚-1‚, ‚-2‚, usw. gebildet.
Die am Programmer #1 angeschlossene BESC ist also soetwas wie der Master; es werden nur ihre Parameter eingelesen, und ihre Parameter werden beim schreiben auf alle anderen BESCs dupliziert. Auf diese Weise wird die Konsistenz aller BESCs erreicht. Dieser Mechanismus kann übrigens nachvollzogen werden, indem die ‚read/write/flash/verify target no.X‘ Ausgaben im Statusfenster von BLHeliTool verfolgt werden.
Double-Brushless Umbauten (Haupt- und Heckmotor) von Mikrohelis
Im Unterschied zum Multicopter sind bei einem Double-brushless (DBLBL) Umbau die BESCs für Haupt- und Heckmotor notwendigerweise unterschiedlich, und ein Klonen der Parameter ist daher gegenstandslos. Trotzdem bietet die Multiple-ESC Funktion auch hier Vorteile. Sie führt zu einer vereinfachten elektrischen Verschaltung da nur ein Programmierstecker benötigt und die Verdrahtung einfacher wird. Zusätzlich ergibt sich ein komfortableres Handling da nun durch einen einfachen Klick auf ein Drop-down-Feld in BLHeliTool festgelegt werden kann ob der Haupt- oder Heck-BESC angesprochen werden soll, anstatt das jedesmal der Programmierstecker umgesteckt werden muss.
Die BESC für den Hauptmotor wird einfach dadurch ausgewählt, dass im Feld Multiple ESC Mode die Einstellung Main ESC ausgewählt wird; der Heckmotor wird mit Tail ESC ausgewählt. Es ist dabei wichtig, dass die BESC für den Hauptmotor am Programmer #1, d.h. C2CK(#1) und C2D, angeschlossen wird, und die BESC für den Heckmotor an Programmer #2, d.h. C2CK#2 und C2D.
Verwendung als Einzel-ESC-Programmer
Jede der am owSilProg-Programmer angeschlossenen BESC kann auch einzeln angesprochen werden indem eine der Einzel-ESC-Einstellungen im Feld Multiple ESC Mode gewählt wird. Das heisst, wird single ESC no.1 ausgewählt, dann verwendet BLHeliTool bei der Ausführung der Read/Write/Flash/Verify Operationen ausschliesslich Programmer #1, wird single ESC no.2 ausgewählt, dann wird nur Programmer #2 benutzt,… , und wird single ESC no.8 ausgewählt, dann wird nur Programmer #8 benutzt.
Die Einstellungen default und Main ESC sind tatsächlich Aliase für single ESC no.1, d.h., alle drei verwenden nur Programmer #1. Ganz ähnlich ist Tail ESC ein Alias für single ESC no.2, und Beide verwenden Programmer #2.
Zusammenfassung der Multiple-ESC Modi
- Die Modi default, Main ESC und single ESC no.1 verhalten sich exakt identisch; sie benutzen alle Programmer #1.
- Die Modi Tail ESC und single ESC no.2 verhalten sich exakt identisch; beide benutzen Programmer #2.
- Die Modi single ESC no.3, single ESC no.4, … verwenden Programmer #3, #4, und so weiter.
- Die Modi Bi Copter, Tri Copter, …, Hexa Copter verhalten sich für Read und Write/Flash/Verify Operationen unterschiedlich. Die Read Operation wird nur für Programmer #1 ausgeführt, während Write/Flash/Verify für alle Programmer nacheinander, beginnend mit Programmer #1 bis zum letzten Programmer entsprechend der Multicoptereinstellung, durchgeführt.
Die beschriebenen Mechanismen werden natürlich auch von der BLHeliBox zur Verfügung gestellt.
Elektrische Verbindungen
Damit das oben Beschriebene funktioniert, müssen alle BESC natürlich elektrisch mit dem owSilProg-Programmer (oder der BLHeliBox) verbunden werden. Jede BESC benötigt eine Verbindung an ihren C2CK und C2D Anschlüssen. Der Programmer weist einen C2D Anschluss auf, welcher mit allen BESCs zu verbinden ist. Demgegenüber weist der Programmer acht C2CK Anschlüsse auf, welche mit C2CK(#1), C2CK#2, …, C2CK#8 bezeichnet sind. Der C2CK(#1) Anschluss ist offensichtlich mit dem C2CK Anschluss des BESCs zu verbinden, welcher vom Programmer #1 verwaltet werden soll, C2CK#2 ist mit dem C2CK Anschluss des BESCs zu verbinden, welcher vom Programmer #2 verwaltet werden soll, und so weiter. Zusätzlich ist eine Verbindung zwischen der Masse (GND) des Programmers und einer BESC herzustellen. Wird eine BLHeliBox benutzt, und soll diese über die BESCs bzw. den an ihnen angeschlossenen Lipo mit Strom versorgt werden, dann wird auch noch eine Vcc Verbindung benötigt. Der Schaltplan sieht dann skizziert wie folgt aus:
Glücklicherweise können beim owSilProg-Programmer lange Zuleitungen benutzt werden (40 cm sind kein Problem); es lassen sich daher alle BESCs mit einem Kabelbaum am Programmer anschliessen ohne das man sich groß um Leitungslängen sorgen muss.
Die Zuordnung der Pins am Arduino bzw. der BLHeliBox zu den neun Anschlüssen C2D, C2CK(#1), C2CK#2, …, C2CK#8 ist in den folgenden Tabellen aufgelistet. Bitte beachtet das bei denjenigen BLHeliBoxen, welche das übliche Arduino-LCD-Shield benutzen, sowie den Mega-Boards die Pinzuordnung unterschiedlich sind.
|
Arduino Nano, Uno, Duemilanove, and so on; BLHeliBox No.3, No.4, No.5 (Arduino + LCD4884) hex files: owsilprog_v1XX_mXXX_pb3pb4.hex, BLHeliBox_v10X_lcd4884_XXX_pb3pb4.hex |
|||||||||
|---|---|---|---|---|---|---|---|---|---|
| C2CK (#1) | C2D | C2CK#2 | C2CK#3 | C2CK#4 | C2CK#5 | C2CK#6 | C2CK#7 | C2CK#8 | |
| Arduino | D11 | D12 | D10 | D9 | D8 | A2 | A3 | A4 | A5 |
| ISP | MOSI | MISO | |||||||
| Atmega | PB3 | PB4 | PB2 | PB1 | PB0 | PC2 | PC3 | PC4 | PC5 |
|
BLHeliBox No.1, No.2 (Arduino Uno + LCD Shield) hex file: BLHeliBox_v1XX_m328p_16MHz_pb3pb4 |
|||||||||
|---|---|---|---|---|---|---|---|---|---|
| C2CK (#1) | C2D | C2CK#2 | C2CK#3 | C2CK#4 | C2CK#5 | C2CK#6 | C2CK#7 | C2CK#8 | |
| Arduino | D11 | D12 | D2 | D3 | A1 | A2 | A3 | A4 | A5 |
| ISP | MOSI | MISO | |||||||
| Atmega | PB3 | PB4 | PD2 | PD3 | PC1 | PC2 | PC3 | PC4 | PC5 |
|
Arduino Mega, Mega 2560 hex files: owsilprog_v1XX_mXXX_pb2pb3.hex |
|||||||||
|---|---|---|---|---|---|---|---|---|---|
| C2CK (#1) | C2D | C2CK#2 | C2CK#3 | C2CK#4 | C2CK#5 | C2CK#6 | C2CK#7 | C2CK#8 | |
| Arduino | D51 | D50 | D49 | D48 | D47 | D46 | D45 | D44 | D43 |
| ISP | MOSI | MISO | |||||||
| Atmega | PB2 | PB3 | PL0 | PL1 | PL2 | PL3 | PL4 | PL5 | PL6 |
|
Cheapduino (Atmega8 at 16MHz) hex files: owsilprog_v1XX_m8_16mhz_pb3pb2_cheapduino.hex |
|||||||||
|---|---|---|---|---|---|---|---|---|---|
| C2CK (#1) | C2D | C2CK#2 | C2CK#3 | C2CK#4 | C2CK#5 | C2CK#6 | C2CK#7 | C2CK#8 | |
| Arduino | D11 | D10 | D9 | A0 | A4 | A5 | A5 | A5 | A5 |
| ISP | MOSI | ||||||||
| Atmega | PB3 | PB2 | PB1 | PC0 | PC4 | PC5 | PC5 | PC5 | PC5 |
V. Die BLHeliBox und ihre Bedienung
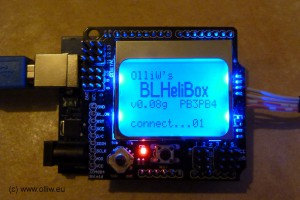
Was ist die BLHeliBox? Die BLHeliBox erfüllt gleich mehrere Aufgaben. Zum einen ist sie eine Programmierbox (manche nennen es auch Programmierkarte) für BLHeli-Silabs-BESCs, mit der die BLHeli-Parameter „in-field“ unabhängig von einem PC komfortabel eingestellt werden können. Hierzu wird die BLHeliBox einfach mit den C2-Programmieranschlüssen des BESCs verbunden. Die Einstellungen können dann mittels der Tasten und dem Display vorgenommen werden. Zum anderen funktioniert sie exakt wie ein owSilProg-Programmer. D.h. sie kann über einen USB-Anschluss mit einem PC verbunden werden, und mit dem Windows-Program BLHeliTool können der BESC mit der BLHeli-Firmware geflasht und die Parameter eingestellt werden, genauso wie es in Kapitel II und III beschrieben wurde. Die BLHeliBox erfüllt also drei Aufgaben:
Funktionen der BLHeliBox
- Flashen von Silabs BESCs mit BLHeli
- Einstellen der Parameter der BLHeli-BESC vom PC aus mit dem Windows-Program BLHeliTool
- Einstellen der Parameter der BLHeli-BESC „in-field“, unabhängig von einem PC
Wer eine BLHeliBox hat, braucht also keinen owSilProg-Programmer, denn der ist bereits mit integriert (und spart sich das entsprechende Geld). Die BLHeliBox bietet jedoch zusätzlich den Vorteil immer und überall schnell und einfach die Parameter von BLHeli-BESCs einstellen zu können.
Wie wird sie benutzt? Die Bedienung der BLHeliBox ist eigentlich kinderleicht und müsste selbst-erklärend sein:
Soll sie als owSilProg-Programmer benutzt werden, nun denn, dann einfach genauso wie einen owSilProg-Programmer benutzen… also per USB-Kabel mit dem PC und per C2-Programmierleitungen mit dem BESC verbinden, BLHeliTool starten, das war’s.
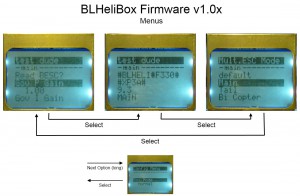
Bei der Verwendung als Programmierbox hat man die Funktion der Tasten schnell heraus. Bzgl. Read BESC? und Write BESC? ist allerdings eine Bemerkung vielleicht angebracht: Hier zunächst mit der Taste, welche den Wert von Optionen erhöht, yes einstellen, und dann die Select-Taste solange drücken bis (nach ca. 2 Sekunden) Read oder Write ausgeführt wird (ist im Display zu erkennen). Es gilt übrigens generell, auch in den anderen Menus, das eine ausgewählte Funktion durch langes Drücken der Select-Taste ausgeführt wird, während mit einem kurzen Drücken zum nächsten Menu gesprungen wird.
Die Menu-Struktur sieht bei der BLHeliBox-Firmware v1.0x wie folgt aus (am Beispiel der BLHeliBox No.5 gezeigt):
Für eine frühe Version der BLHeliBox und ihrer Funktionen habe ich vier Videos erstellt (beginne mit Part 2):
|
Part 1: Basics and Hardware |
Part 2: Setting Parameters, the BLHeliBox as Programming Box/Card |
|
Part 3: Setting Parameters, the BLHeliBox as Interface to a PC |
Part 4: Flashing the BLHeli Firmware into the BESC |
VI. BLHeliBox: Bauanleitungen
Leider gibt es bis dato keine Hardware-Lösung mit der die BLHeliBox einfach (<10 min) UND billig (< $15) realisiert werden kann. Ich stelle unten mehrere Möglichkeiten vor, welche von "am einfachsten und billigsten aber am uncoolsten“ bis „nicht so einfach und billig aber am coolsten“ reichen. Mir persönlich gefällt natürlich der letzte Vorschlag am Besten, die BLHeliBox No.5, die Mehrarbeit war mir der deutlich größere Coolnessfaktor wert :). Aber wählt selbst.
| Box | Hardware | Ranking | Kosten* |
| No.1 | Arduino Uno + LCD-Keypad Shield | einfach: ++, billig: ++, cool: + | $20 |
| No.2 | Arduino Uno + LCD-Keypad Shield + Hobbyking Spannungsbooster | einfach: +, billig: +, cool: ++ | $24 |
| No.3 | Arduino Uno + LCD4884 Shield | einfach: +, billig: o, cool: +++ | $30 – 30Eur |
| No.4 | Arduino Nano + LCD4884 Shield + Kleinzeug | einfach: o, billig: o, cool: ++++ | $30 – 30Eur |
| No.5 | ArduBox mit LCD4884 Modul | einfach: o, billig: +, cool: +++++ | $20- $25 |
* Kosten sind inkl. Versand
Diese Lösungen basieren all auf Arduino Boards, was einen möglichst einfachen Aufbau garantiert. In allen Fällen sind die passende BLHeliBox-Firmware zu flashen sowie GND, C2CK und C2D Leitungen an die entsprechenden Stellen anzulöten. Hierzu folgt man genau Kapitel I, mit der passenden Einstellung in Schritt 4.
VI.1. Arduino Uno + LCD-Keypad Shield
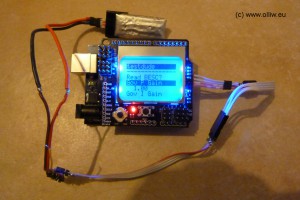
Der Aufbau dieser Box ist wirklich kinderleicht, und man ist mit $20 (inkl. Versand) dabei. Copperclad @ helifreak hat hier Pionierarbeit geleistet (hier). Diese Box hat allerdings einen Nachteil. Die BLHeliBox muss natürlich mit Strom versorgt werden. Da das LCD-Keypad Shield aber mit 5 V betrieben werden muss, reicht ein 1S Lipo-Akku zur Versorgung nicht aus (das Shield funktioniert tatsächlich gerade so ab 4 V, aber das ist sehr knapp). Wer also einen 1S-Heli hat, und das werden Viele sein, der kann die Box nicht einfach über die Versorgung des Helis bzw. BESCs mitbetreiben, sondern muss der Box eine extra Versorgung spendieren, wie z.B. ein zusätzlicher 2S Lipo (dieses „Problem“ tritt nicht auf wenn die Box am PC angeschlossen ist; dann wird sie über den USB versorgt).
Was wird benötigt
- Arduino Uno
- Arduino LCD-Keypad Shield
- drei Kabel
- Kleinzeug um die Box mit Strom zu versorgen
- die aktuelle Version des owSilProg Firmwarepakets
Günstige Quellen für den Arduino Uno und das LCD-Keypad Shield sind im Appendix angegeben. Wie Ihr die Box mit Strom versorgen wollt hängt natürlich stark von eurer Situation ab. Ein einfacher Weg wäre ein extra 2S Lipo zum Anstecken an einen geeignet gefertigten Stecker.
Was ist zu tun
- Flashen der BLHeliBox-Firmware. Vorgehen genau wie in Kapitel I, nur mit der Einstellungen ‚BLHeliBox on Arduino Uno + LCD Shield‘ in Schritt 4.
- Anbringen der GND, C2CK, C2D Leitungen. Drei Kabel mit den entsprechenden ISP-Anschlüssen verbinden, es kann sowohl der ISP-Stecker am Uno Board (siehe Bild Kapitel I, Schritt 8) sowie am LCD-Keypad Shield (siehe nachfolgende Bilder) benutzt werden.
- Versorgungsspannung realisieren. Da gibt es viele Möglichkeiten; eine wäre einen 2S-Lipo über einen Ein-Aus Schalter mit GND (Minus Pol) und den Vin Pad (Plus Pol) zu verbinden. Der Lipo findet evtl. sogar zwischen den beiden Boards Platz.
- Zusammenstecken der beiden Boards.
Das Ganze sieht dann z.B. so aus (leider nicht zu erkennen wie die Versorgung realisiert wurde):
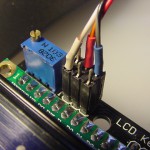
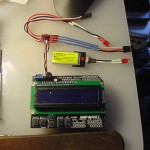
photos by copperclad @ helifreak
VI.2. Arduino Uno + LCD-Keypad Shield + Hobbyking Spannungsbooster
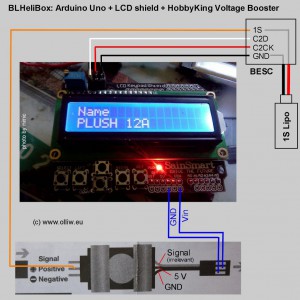
Diese Box ist perfekt (aber es geht noch cooler). Nimic @ helifreak hat hier Pionierarbeit geleistet (link). Der Aufbau ist nur unwesentlich aufwendiger as zuvor, es sind nun 6 einfache Lötstellen zu meistern, und man ist ab $24 (inkl. Versand) dabei. Das im Unterkapitel VI.1 beschriebene Problem mit der Versorgungsspannung für die Box wird elegant mit einem Stepup-Konverter (Spannungsbooster) gelöst, welcher aus den 1S des Lipos 5 V (oder mehr) macht. Im Vergleich zur Box in Unterkapitel VI.1 muss also „nur“ ein Booster zusätzlich eingebaut werden.
Was wird benötigt
|

|
Günstige Quellen für den Arduino Uno und das LCD-Keypad Shield sind im Appendix angegeben. Im Prinzip eignet sich jeder beliebige Spannungsbooster, der 5 V Ausgangspannung liefert. Ich benutze gerne den Hobbyking Voltage Booster hier (er liefert ca. 5.2 V). Für $2.99 ein fairer Deal.
Was ist zu tun
- Flashen der BLHeliBox-Firmware. Vorgehen genau wie in Kapitel I, nur mit der Einstellungen ‚BLHeliBox on Arduino Uno + LCD Shield‘ in Schritt 4.
- Anbringen der GND, C2CK, C2D Leitungen. Drei Kabel mit den entsprechenden ISP-Anschlüssen verbinden, es kann sowohl der ISP Stecker am Uno Board (siehe Bild Kapitel I, Schritt 8) sowie am LCD-Keypad Shield (siehe nachfolgende Bilder) benutzt werden.
-
Spannungsbooster einbauen. Der GND und Vout Anschluss des Spannungsboosters kommen an die GND und Vin Pads am Uno Board oder LCD-Keypad Shield. Der Spannungseingang des Boosters geht natürlich zum Pluspol des Lipos. Hier eine Skizze der Verschaltung:
- Zusammenstecken der beiden Boards.
Hier eine Bildergallerie, welche die einzelnen Schritte im Detail darstellt:
VI.3. BLHeliBox No.3: Arduino Uno + LCD4884 Shield
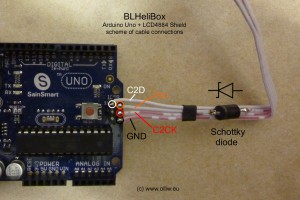
Diese Lösung ist perfekt, cool und leicht zu bauen, aber mit ca. $30 bis 30 Eur nicht ganz billig. Cool ist sie wegen dem graphischen Display und weil die Box deutlich kleiner/kompakter ist. Die Elekronik kann direkt aus einem 1S Lipo versorgt werden, ein Voltagebooster ist nicht nötig (der Arduino wird dann zwar ausserhalb der Spezifikation betrieben, aber das macht nichts). Wenn die Box allerdings gleichzeitig am USB und an einen Lipo angeschlossen würde, dann würde der Lipo „schnell-geladen“ werden. Dies läßt sich aber leicht vermeiden, indem eine Schottky-Diode in die plus-Versorgungsleitung vom Lipo eingebaut wird. Der Aufbau besteht also darin, vier Kabel und eine Diode anzubringen.
Was wird benötigt
- Arduino Uno
- Arduino LCD4884 Shield
- Schottky-Diode (z.B. SB130)
- vier Kabel
- die aktuelle Version des owSilProg Firmwarepakets
Günstige Quellen für den Arduino Uno und das LCD4884 Sield sind im Appendix angegeben. Schottky-Dioden gibt es im lokalen Fachhandel; jede ist geeignet (ich habe die Beobachtung gemacht, dass je „dicker“ die Diode desto niedriger die Durchlassspannung und desto besser für uns geeignet).
Was ist zu tun
- Flashen der BLHeliBox-Firmware. Vorgehen genau wie in Kapitel I, nur mit der Einstellungen ‚BLHeliBox on Arduino Uno + LCD4884 Shield‘ in Schritt 4.
-
GND, C2CK, C2D, und Vcc Verbindunsgleitungen. In das Kabel vom Plus-Pol der BESC bzw. Lipo ist eine Schottky-Diode einzulöten (Kathode Richtung Box, Anode Richtung Lipo). Die Kabel dann mit den entsprechenden Pins des ISP-Steckers am Uno Board verbinden, siehe nachfolgendes Bild.
- Zusammenstecken der beiden Boards.
Das Ganze sieht dann z.B. so aus:
VI.4. Arduino Nano + LCD4884 Shield + Kleinzeug
Diese Lösung benötigt etwas mehr Bastelaufwand, und etwas Geld (ca. 35Eur); die Box ist dafür im Vergleich zu den vorhergehenden Lösungen deutlich kleiner und VIEL handlicher. Anstatt eines Arduino Uno wird nun ein Arduino Nano verwendet, weil er alles hat was man braucht aber kleiner (und billiger) als ein Uno ist. Zusätzlich benötigt man ein „Adapterboard“, welches man sich selber zusammenbaut.
Was wird benötigt
|

|
Günstige Quellen für den Arduino Nano und das LCD4884 Shield sind im Appendix zu finden. Zur Schottky-Diode wurden im Kapitel IV.3 Angaben gemacht. Die weiterhin für’s Adapterboard benötigten Kleinteile sollten im lokalen Fachhandel zu finden sein.
Was ist zu tun
- Flashen der BLHeliBox-Firmware. Vorgehen genau wie in Kapitel I, nur mit der Einstellungen ‚BLHeliBox on Arduino Nano (w m328p) + LCD4884 Shieldd‘ in Schritt 4.
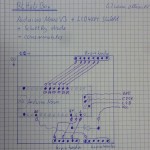
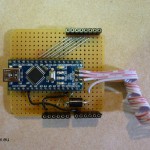
- Adapterboard basteln. Hierzu wird der Arduino Nano auf eine Leiterplatte gelötet, und Verbindungen zu entsprechend angebrachten Steckerleisten hergestellt. Die nachfolgende Bilderreihe gibt eine Anregung.
- Zusammenstecken der Boards.
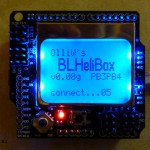
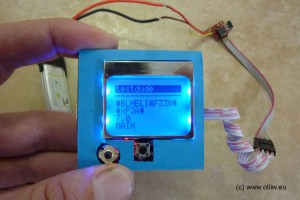
Diese Bilderreihe zeigt meinen Aufbau. Ich habe mir noch den Spass gemacht und habe das ganze mit passend zugeschnittenem, dicken Papier umhüllt. Macht die ganze Box noch einiges touchier:
VI.5. BLHeliBox No.5: ArduBox mit LCD4884 Modul
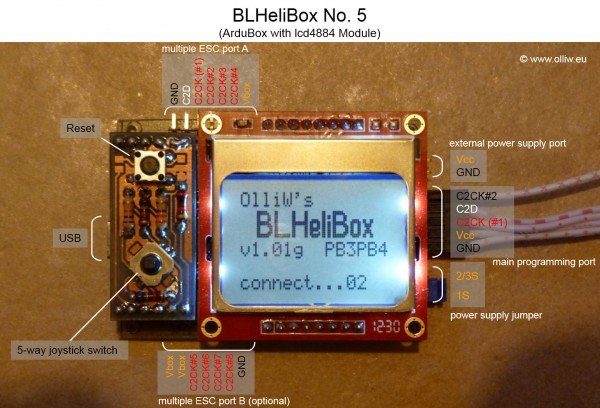
Dies ist sicher die bisher coolste, kompakteste, beste, und im Vergleich dazu auch billigste Lösung! Es wird einfach eine ArduBox verwendet, welche alles nötige bietet, und die BLHeliBox Firmware aufgespielt. Die BLHeliBox No.5 bietet alle Anschlüsse, um die Multiple-ESC Funktion voll zu nutzen, kann ideal für Doppel-Brushless-Umrüstungen (Main&Tail) von Microhelis benutzt werden, und kann mit einem Jumper von 1S auf 2/3S Spannungsversorgung umgeschalten werden.
Was wird benötigt
- ArduBox mit LCD4884 Modul
- die aktuelle Version des owSilProg Firmwarepakets
Bisher muss man sich die ArduBox noch selber erstellen, aber die ArduBox wird es möglicherweise bald auch zu kaufen geben (nicht durch mich, aber jemand Anderes). Für alle Infos zur ArduBox siehe hier.
Was ist zu tun
- Flashen der BLHeliBox-Firmware. Vorgehen genau wie in Kapitel I, nur mit der Einstellungen ‚BLHeliBox No.5 (Arduino Nano w m328p + LCD4884 module)‘ in Schritt 4.
Hier ist noch eine Detailansicht der BLHeliBox No.5, mit allen Anschlüssen:
VII. Die Bluetooth-Erweiterung
Der owSilProg-Programmer, die BLHeliBoxen und BLHeliTool können extrem leicht auch mit einem Bluetoothadapter benutzt werden. D.h., am owSilProg-Programmer und/oder die BLHeliBox wird ein Bluetooth-Modul angeschlossen, und die Kommunikation mit BLHeliTool erfolgt dann wireless. Wenn alles fertig aufgesetzt ist, was mit den entwickelten Methoden leicht ist, dann merkt man in der Praxis vom wireless nichts (ausser natürlich das fehlende Kabel), d.h., die Bedienung ist genau wie zuvor, ohne irgendwelche speziellen Handlungen.
Welches Bluetooth-Modul?
Ich verwende das Bluetooth-Modul welches jeder für diese Zwecke verwendet. Konkret habe ich mir das JY-MCU Bluetooth-Modul mit Spannungsregler zugelegt. Mögliche Quellen gibt’s im Appendix.
Anschluss des Bluetooth-Moduls an den owSilProg-Programmer oder BLHeliBox
Das Bluetooth-Modul wird, über eine Diode (jede beliebige taugt, z.B. 1N4148), an die Rx- und Tx-Pins (digital D0 und D1) des Arduino angeschlossen, wie im Bild nachfolgend gezeigt.
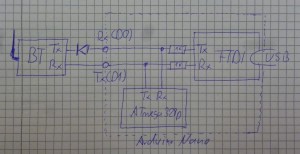
Der Widerstand in der Tx-Leitung zum USB-Adapter ist für die Funktion sehr wichtig, muss allerdings nur in den seltensten Fällen wirklich explizit eingefügt werden. Bei den Arduino mit USB-Anschluss sind die gezeigten Widerstände bereits integriert, und Ihr braucht euch nicht weiter darum zu kümmern. Auch ansonsten sind sie überflüssig, zumindest bei USB-Serial-Adaptern mit FTDI Chip. Also, faktisch wird nur die Diode benötigt.
Einrichten von Win7 auf das Bluetooth-Modul
Folge dieser Beschreibung, bis zum Punkt an dem Teraterm zum Einsatz kommt: http://www.hobbytronics.co.uk/bluetooth-module-connection
Konfiguration des Bluetooth-Moduls
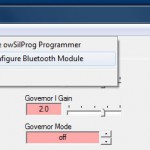
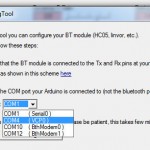
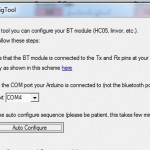
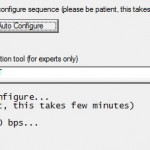
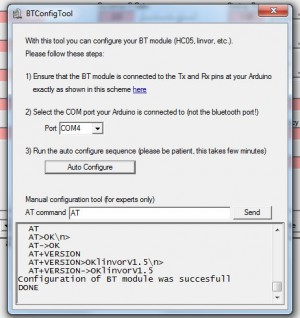
Dazu benutzt man das in BLHeliTool integrierte BTConfigTool, welches die Konfiguration vollautomatisch vornimmt. Die Schritte in Bildern:
Weitere Infos
http://www.rcgroups.com/forums/showpost.php?p=23960212&postcount=437
Appendix: Bezugsquellen
Arduino Nano
Deutschland:
- 14.90Eur (+ 3,50Eur Versand) bei lipoly.de
Ausland
- $10.38 (inkl. Versand) bei r_cube_station (ebay)
- $10.99 (inkl. Versand + USB Kabel) bei Dealextreme
- $11.50 (inkl. Versand) bei haoyu_electronics (ebay)
- $9.29 (+ $2.99 Versand) bei Hobbyking
- verschiedene asiatische ebay-Händler: ebay.de
Arduino Uno/Uno R3
- $10.82 Uno oder $14.20 Uno R3 (+ $2.99 Versand) bei Hobbyking
- $12.49 Uno R3 (inkl. Versand + USB Kabel) bei MITAO E-mart (AliExpress), link
- $13.96 Uno (inkl. Versand) bei uzone2012 (ebay), link
- $14.72 Uno (inkl. Versand + USB Kabel) bei jk_parts (ebay), link
- $15.20 Uno R3 (inkl. Versand + USB Kabel) bei Dealextreme, link
- verschiedene andere asiatische ebay-Händler
Cheapduino
- $19.90 für 5 Stück (+ Versand) bei DFRobot
Arduino LCD-Keypad Shield
- $6.90 (inkl. Versand) bei Dealextreme, link
- ab $7 bei asiatischen ebay-Händlern (link)
- Hobbyking $8.32 link (+ $2.99 Versand)
Arduino LCD4884 Sield
Deutschland:
- 15.88Eur (inkl. Versand) bei profit_vanity (ebay)
Ausland
- 11.99Eur (inkl. Versand) bei profit_vanity (ebay)
- $21.67 (inkl. Versand) buychina
- etwa um die $20 bei verschiedene Händlern (benutze google)
Arduino Uno + LCD4884 Sield Combo
Deutschland:
- 26.88Eur (inkl. Versand) bei profit_vanity (ebay)
Ausland
- 23.99Eur (inkl. Versand) bei profit_vanity (ebay)
- $32.99 (inkl. Versand) bei trade_spotting (ebay)
Bluetooth Modul (JY-MCU, HC05)
Europa:
- 8.50Eur (inkl. Versand) bei hillfly3389 (ebay) (UK)
- 8.29Eur (+ 0.99Eur Versand) bei newlaunch (ebay) (UK)
Ausland
- $8.20 (inkl. Versand) bei Dealextreme, link
- etwa um die $10 bei verschiedenen ebay Händlern (benutze google)
Weitere Quellen
- Dieser Thread beinhaltet evtl weitere nützliche Quellenangaben: China SUPER Bauteile-Schnäppchen Thread @ www.micokontroller.net



109 Kommentare