Ich stelle hier einen C2-Programmer zum Flashen von Silicon Labs Mikrokontroller vor, welcher auf einen Atmel AVR Mikrokontroller basiert. Die Atmel AVR Mikrokontroller sind bei Hobbyiesten sehr beliebt, und die nötige Hard- und Software zum Programmieren daher häufig vorhanden. Sie ist zudem extrem billig verfügbar. Der hier vorgestellte C2-Programmer lässt sich sehr leicht realisieren.
Ausserdem ergeben sich daraus „tolle“ Möglichkeiten in Bezug auf einen brushless mCPX mit BLHeli-BESCs, nämlich die Windows GUI BLHeliTool sowie die Programmierbox BLHeliBox! Siehe unten unter Anwendungen oder in den Tutorials!
BLHeliBox, die Box die Alles kann…
Neueste Nachrichten
27. Okt. 2013: Service Update: Support für ESCs mit F390 Chips und Eazy 3A V2 (Firmware).
1. Aug. 2013: Service Update: Support für Turnigy KForce 120A V2.
23. Juli 2013: owSilProg Firmware zur Verwendung des Cheapduino als owSilProg Programmer. Danke Eric für diese geniale Idee!
18. Juni 2013: Service Update: Support für BLHeli 10.4.
11. Mai. 2013: Service Update: Support für BLHeli 10.3.
22. Apr. 2013: Service Update: Support für BLHeli 10.2-b.
14. Apr. 2013: Service Update: Support für BLHeli 10.2.
20. Mar. 2013: Service Update: Support für BLHeli 10.1.
8. Mar. 2013: Service Update: Bug in AvrBurnTool beseitigt. Danke Malphodo!
22. Feb. 2013: Service Update: (i) Unterstützung für BLHeli 10.0, (ii) Implementierung der neuen AN127 und Unterstützung von 14 C8051FXXX Familien. Firmware-Update mit Beschreibung der Neuerungen wie immer unter Firmware. Großer DANK geht an Maksims, der mich auf das AN127-Update gestoßen und stark unterstützt hat!
4. Feb. 2013: Der Bluetooth-Release: Die Unterstützung von Bluetooth ist nun voll integriert, und BTConfigTool ermöglich eine vollautomatische Konfiguration des Bluetooth-Moduls. Auch die ArduBox, nun v0.12, ist für Bluetooth ausgelegt. Firmware-Update mit Beschreibung der Neuerungen wie immer unter Firmware. Die Tutorials werden ASAP angepasst.
29. Jan. 2013: Der Bluetooth-owSilProg Programmer funktioniert nun! Siehe hier und/oder hier. Ich werde den Aufbau natürlich noch vereinfachen und die Tutorials ASAP anpassen.
21. Jan. 2013: Platinen zum Aufbau der BLHeliBox No. 5 sind nun auch käuflich erhältlich.
20. Jan. 2013: Service Update: (i) Unterstützung für BLHeli 9.4, (ii) BLHeliTool v1.01, COM Port endlich konform mit Windows, Flash weiter optimiert und dadurch erneute ehrhebliche Beschleunigung, (iii) BLHeliBox v1.01, Bug entfernt. Firmware-Update mit Beschreibung der Neuerungen wie immer unter Firmware. Die Tutorials sind nun auch vollständig an die Version v1.XX angepasst!
3. Jan. 2013: Das Große Neujahr Update ist da, mit vielen neuen Features und vielen großen und kleinen Verbesserungen! Updates auf owSilProg v1.00, BLHeliTool v1.00, BLHeliBox v1.00, und AvrBurnTool v1.00. Auch die neueste Box, die BLHeliBox No.5, ist aufgeschlagen. Die Firmware-Updates, mit einer Beschreibung der Neuerungen, sind wie immer unter Firmware verfügbar. Die Tutorials werden so schnell wie möglich angepasst!
15. Dez. 2012: Die neue supercoole Funktion ist da: Die Multiple-ESC-Funktion! Eine genauere Beschreibung wird noch kommen, für den Moment möchte ich auf die Threads bei rcgroups und helifreak verweisen.
ältere Nachrichten
Bauanleitungen & Tutorials
- Herstellen eines owSilProg-Programmers
- BLHeliTool: Flashen der BLHeli Firmware
- BLHeliTool: Konfigurieren der BLHeli Parameter
- Die Multiple-ESC Funktion
- Die BLHeliBox und ihre Bedienung
- BLHeliBox: Bauanleitungen
- Die Bluetooth-Erweiterung
Diskussionsthreads
- Flashing Turnigy Plush(SiLabs) success, now with tutorial! (@rcgroups)
- owSilProg: Flashing BESCs with Silabs MCU using AVRs (@rcgroups)
- owSilProg: AVR-alternative to Silabs toolstick, BLHeliTool, BLHeliBox (@helifreak)
Einführung
Die Mikrokontroller von Silicon Labs sind sicher nicht jedermanns/fraus Sache… es hat, denke ich, schon seinen Grund warum im Hobbybereich die AVR’s, PIC’s, STM’s etc. beliebt sind. Im Modellbaubereich kommt man aber nicht immer an den Silabs Chips vorbei. Diese tauchen z.B. in jüngster Zeit immer häufiger in Brushless-ESCs auf, und auch das Umflashen der BESCs mit einer besseren Firmware wird Dank der fleissigen Arbeit einiger Entwickler immer leichter, und damit auch immer beliebter (bei BESCs mit Silabs MCU’s ist BLHeli von sskaug zu nennen).
Im Prinzip gibt es mit dem USB Toolstick von Silabs einen geeigneten und nicht wirklich teuren Programmer, und die benötigte Software/Toolchain gibt’s gratis. Was man als teuer oder billig erachtet ist nun natürlich Ansichtssache… und hängt bei mir auch stark davon ab wie ernsthaft ich in ein Thema einsteigen will. In die Programmierung von Silabs MCUs will ich z.B. nicht einsteigen, und nur um einmal, zweimal eine BESC umzuflashen ist mir der Toolstick deutlich zu teuer und das installieren der Toolchain zu mühselig. Wie auch immer, das Thema Silabs und Umflashen von BESCs war für mich eigentlich kein Thema (zumal ich mit dem Brushless-Umbau meines mCPX sehr zufrieden bin). Aber irgendwie habe ich mir doch mal die Datenblätter zu der Silabs-Programmierschnittstelle angesehen und mir gedacht: Das ist ja gar nicht kompliziert, eigentlich sollte man das doch mit einem AVR realisieren können… und so war die Idee für das owSilProg Projekt geboren…
Zuerst habe ich natürlich das Netz nach DIY Projekten für Silabs-Programmer durchsucht. Gefunden habe ich für den seriellen Port:
– Kawamoto „nanashino“ Yasuhisa’s Einfache C8051F300x Writer (google übersetzt), Original (Japanisch)
und für den LPT Port:
– Wojtek Zabolotny’s Simple evaluation board and Linux programmer for C8051F320
– Okb Rosa’s SLABPROG Simply LPT-programmer for Silabs MCU with C2-interface
So richtig „vertrauenserweckend“ und für eigene Zwecke nützlich fand ich die Lösungen aber nicht, und so war dann nicht nur die Idee geboren sondern auch der Entschluß gefasst, das owSilProg Projekt anzugehen…
Übersicht und Konzept
Das Konzept des Projekts ist eigentlich ziemlich einfach. Ein Atmel AVR Mikrokontroller wird so programmiert, dass er auf der einen Seite Komandos von einer seriellen Schnittstelle (mit TTL Pegel) entgegennimmt und entsprechende Daten auf dieser zurücksendet, und auf der anderen Seite das C2-Interface zum Flashen der Silabs MCUs nachbildet. Diese Firmware habe ich owSilProg getauft. Die serielle Schnittstelle wird dann im Regelfall von einem PC bedient, und dem Anwender über eine GUI zugänglich gemacht. Die von mir angebotene Windows GUI nenne ich SilProgTool. PCs bieten keine serielle TTL-Schnittstellen, d.h. es wird noch zusätzlich ein Adapter benötigt, um die serielle TTL-Schnittstelle an eine Schnittstelle des PCs anzubinden. Dies wird of der USB sein und es wird dann ein USB-TTL-Adapter benötigt, es kann aber auch z.B. Bluetooth sein, oder jede andere Schnittstelle.
Das Konzept besteht also aus drei Komponenten, dem mit owSilProg geflaschten AVR, einem Adapter, und einem „Bedienprogram“. SilProgTool benutzt den COM Port, und das Blockschaltbild sieht dann so aus:
Das, meiner Meinung nach, schöne an dem Konzept ist, das es sehr flexibel ist. So können die Grenzen zwischen den drei Komponenten verschwimmen. Man kann z.B. daran denken owSilProg und den Adapter in einem AVR zu verschmelzen, um z.B. einen USB-C2-Programmer zu realisieren. Oder man kann alle drei Komponenten in einem Gerät vereinen, und so eine Programmier-Box für einen BESC realisieren (siehe BLHeliBox). Da die Kommunikation über einfache Befehle über eine serielle Schnittstelle abläuft ohne besondere Synchronisationsanforderungen, ist es auch sehr leicht eine neue Bediensoftware je nach Wunsch und Laune zu schreiben. Benutzt man z.B. als Adapter einen der günstigen Bluetooth-TTL-Adapter könnte die Bediensoftware eine Smartphone-App sein. Und soweiter und so fort. Den Möglichkeiten sind also nur durch die Kreativität Grenzen gesetzt. Tatsächlich hoffe ich ein bischen auf eure Kreativität; ich bin gespannt darauf wozu das führen wird.
owSilProg Firmware
Über die Firmware für den AVR gibt es eigentlich wenig zu sagen. Sie kann im Prinzip auf jeden ATmega und ATiny mit mehr als 4kB Flash angepasst werden (nennt mir Eure Wünsche und ich werde versuchen sie zu erfüllen :)). Auch bezüglich der Taktfrequenz ist man sehr flexibel, alles von 1-20 MHz sollte gehen. Es muss allerdings ein Keramikresonator verwendet werden (Quarz ist natürlich besser), der interne RC Oszillator ist nicht genau genug.
Unten biete ich die HEX Files für einige verschiedene Konfigurationen an. Die Baudrate ist auf 38400 bps festgesetzt. Welche Pins (des Mikrokontrollers) für die C2CK und C2D Leitungen benutzt werden, ist aus dem Hex-Filenamen ersichtlich. Bei den Arduinos lässt sich der ISP-Stecker sehr für gut die C2-Interfaceanschlüsse nutzen, die Pinbelegung ist dann (ausser für Mega Boards) wie folgt:
PD1 = Tx
PD0 = Rx
PB3 = C2CK
PB4 = C2D
owSilProg Kommandos
Die Kommunikation läuft grundsätzlich so ab, dass ein Befehl über die serielle TTL-Schnittstelle an den owSilProg-AVR geschickt wird. Dieser schickt zunächst die empfangenen Zeichen zurück. Als Nächstes wird die Statusinformation „ok“ oder „er“ zurückgesendet je nachdem ob der Befehl erkannt und erfolgreich abgearbeitet wurde oder ein Fehler aufgetreten ist. Wurde kein Fehler erkannt werden falls Daten zurückzusenden sind diese nun angehängt. Die Rücksendung wird mit den zwei Zeichen x0D x3E oder „\n>“ in C-Schreibweise abgeschlossen. Da im Datenstrom ansonsten nur lesbare Zeichen vorkommen, lässt sich an den Schlusszeichen das Ende einer Rückmeldung erkennen. Die „komische“ Wahl der zwei Schlusszeichen ist ganz nützlich, denn so ergibt sich ein kommandozeilenartiges Bild bei Verwendung eines einfachen Terminals (was sehr praktisch für Testzwecke ist). Noch eine Bemerkung: Daten sind als Hex-String anzugeben/zulesen, also der Wert 75 = 0x4B entspricht den zwei Zeichen „4B“.
Beispiele:
„i“ → „iok\n>“ oder „ier\n>“
„bw01000012“ → „bw01000012ok\n>“ oder „br01000012er\n>“
„br020000“ → „br020000okXXZZ\n>“ oder „br020000er\n>“
Folgende Befehle werden „verstanden“ (ab owSilProg v0.07):
„v“ = version
Liefert die Versionszeile „OlliW SilProg vX.XX PXXPXX\n>“ (das ist die einzige Rückmeldung welche kein „ok“ oder „er“ enthält). Dieser Befehl eignet sich auch zum Testen ob die Kommunikation über die serielle Schnittstelle funktioniert.
„t“ = test serial connection
Liefert „tok\n>“ zurück, hat aber ansonsten keine Wirkung. Dieser Befehl testet ob die Kommunikation über die serielle Schnittstelle funktioniert.
„r“ = reset
Initialisiert das C2 Interface und führt ein Reset aus; liefert „rok\n>“ zurück.
„d“ = device ID
Liest die Device ID der Silabs MCU, liefert „dokXX\n>“ (wobei „XX“ für das Device-ID-byte steht) oder „der\n>“. Für FF33x MCUs is die ID 0x0A. Dieser Befehl eignet sich auch zum Testen ob die C2-Kommunikation (noch) steht.
„i“ = init
Initialisiert das FPI, liefert „iok\n>“ oder „ier\n>“ zurück.
„e“ = device erase
Löscht den gesamten Flashspeicher, liefert „eok\n>“ oder „eer\n>“ zurück.
„p“ = page erase
Löscht eine Page im Flashspeicher. Die Page-Nummer in Hex Format „XX“ ist dem Befehl anzuhängen, der Befehl lautet also „pXX“. Liefert „pXXok\n>“ oder „pXXer\n>“.
„br“ = block read
Liest einen Block von Bytes aus dem Flash aus. Hierzu ist die Anzahl „XX“ der zu lesenden Bytes sowie die Adresse „ZZZZ“ ab der gelesen werden soll anzugeben. Die Daten werden dann als Hex-String zurückgeliefert. Durch zusätzliche Angabe eines „:“ nach den einführenden „br“ können die Daten auch im Intel-Hex-Format erhalten werden. Der Befehl und die Rückmeldung (wenn kein Fehler auftrat) sieht also so aus:
“brXXZZZZ“ → „brXXZZZZok…Daten…\n>“
“br:XXZZZZ“ → „br:XXZZZZok:XXZZZZ00…Daten als Hex…CC\n>“, wobei CC die Checksumme ist
„bw“ = block write
Schreibt einen Block von Bytes in das Flash. Hierzu ist die Anzahl „XX“ der zu schreibenden Bytes sowie die Adresse „ZZZZ“ ab der geschrieben lesen werden soll anzugeben. Die Daten werden dann als Hex-String angehängt. Durch zusätzliche Angabe eines „:“ nach den einführenden „bw“ können die Daten auch im Intel-Hex-Format angegeben werden. Der Befehl und die Rückmeldung (wenn kein Fehler auftrat) sieht also so aus:
“bwXXZZZZ…Daten…“ → „bwXXZZZZ…Daten…ok\n>“
“bw:XXZZZZ00…Daten als Hex…CC“ → „bw:XXZZZZ00…Daten als Hex…CCok\n>“, wobei CC die Checksumme ist
Weitere „Spezial“-Befehle:
„g“ = get last error
„ma“ = query or set max number of ESC (used for the multiple ESC function)
„ms“ = query or set actice ESC (used for the multiple ESC function)
„cl“ = set C2CK low
„ch“ = set C2CK high
„cz“ = set C2CK high-Z
„xXX“ = extended commands
Anmerkungen:
- Zum vollständigen Aufsetzen der Kommunikation muss erst ein Reset und dann ein Init durchgeführt werden, also die Befehlsfolge „ri“ abgearbeitet werden.
- Bei den Blockread- und Blockwrite-Kommandos kann nach den ersten zwei Zeichen auch ein „?“ angegeben werden. Die Daten werden dann nicht im Hex Format interpretiert, sondern als Ein-byte Characters. Dies kann für Testzwecke sehr nützlich sein. Da die Daten jedoch i.A. nicht nur lesbare Zeichen enthalten, funktioniert die Erkennung des Datenstromendes anhand des Zeichens „\n“ nicht sicher.
Windows GUI SilProgTool
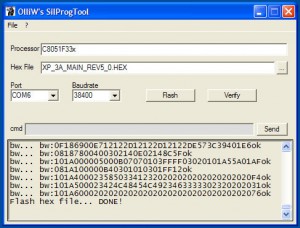
Die Windows GUI SilProgTool ermöglicht das Flashen von Hex Files. Es gibt noch einige weitere Funktionen, wie z.B. Verifizieren und eine Debugzeile, aber das wird sich im Laufe der Zeit sicher noch ändern/verbessern. Ansonsten sollte die Bedienung eigentlich klar sein.
Bemerkung: Das owSilProg-Projekt hat sich sehr schnell fort entwickelt (glücklicherweise :-)). Ich war aber hauptsächlich mit dem Flashen von BLHeli auf Silabs-BESCs beschäftigt, da dies im Moment die wichtigste Anwedung zu sein scheint, und SilProgTool ist dadurch etwas veraltet. Im Moment ist es besser BLHeliTool zu benutzen (welches im Gegensatz sehr gut funktioniert :-)).
Nützliches
Dokumentation zum C2 Interface:
- C2 Interface Specification [.pdf]
- AN127 Flash Programming via the C2 Interface [.pdf]
- AN124 Pin Sharing Techniques for the C2 Interface [.pdf]
Anwendungen
In dieser Rubrik versuche ich Beispiele für Anwendungen von owSilProg oder Links darauf zu sammeln.
– Der (bisher) einfachste UND billigste Weg um BLHeli zu flashen. Hierfür wird ein Arduino Nano V3 benutzt, und mit den neuesten Versionen von AvrBurnTool und BLHeliTool erledigt sich alles mit ein paar Clicks. Wie die Bilder zeigen besteht die ganze Bastelarbeit darin, drei Kabel an den Arduino anzulötet – wenn das nicht einfach ist :). Details gibt’s im Tutorial. Den Arduino Nano gibt es bereits für unschlagbare $10.50 inkl. Versand; für günstige Bezugsquellen schaut hier.
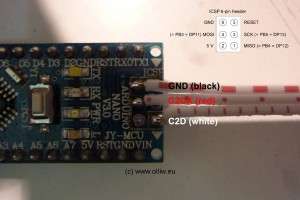
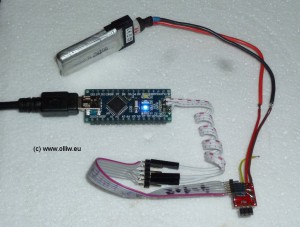
– Die BLHeliBox zum Konfigurieren und Flashen von BLHeli-BESCs. Basierend auf owSilProg ist es einfach eine Box zu bauen, welche „alles“ kann: (1) Flashen der Silabs-BESCs wie üblich über den PC, (2) Konfigurieren von BLHeli-BESCs wie üblich mit BLHeliTool über den PC, (3) „in-field“ Konfigurieren von BLHeli-BESCs unabhängig vom PC. Im letzten Fall arbeitet die Box als sehr komfortable „Programmierkarte“. Weitere Infos gibt’s im Tutorial. Ich habe zur BLHeliBox (v0.07) auch vier YouTube Videos gemacht. Hier eines der Videos als Appetizer:
Für Parts 1, 3, und 4 siehe mein YouTube Kanal oder im Tutorial
– Wie cool ist den das: Die BLHeliBox gibt es nun auch mit graphischen Display! Und klein ist sie auch. Und ein Stepup-Konverter wird auch nicht mehr benötigt. Sie besteht aus einem Arduino Nano oder Arduino Uno, sowie einem LCD4884 Shield. Bauanleitung verfügbar im Tutorial.
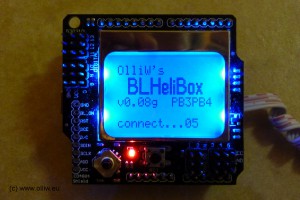
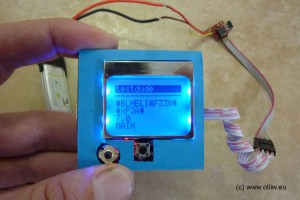
– Copperclad hat sich eine BLHeliBox aus einem Arduino Uno + LCD Shield zusammen gebastelt. Firmware flashen, zusammenstecken, 3 Kabel anlöten… fertig… siehe hier. Fehlt nur noch ein Hobbyking Stepup-Konverter (Turnigy Voltage Booster), dann wäre es 1000%ig perfekt! Hier ein Foto von Copperclad’s Aufbau:
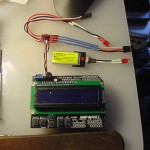
photo by copperclad @ helifreak
– Nimic hat die BLHeliBox mit Arduino Uno + LCD Shield + HobbyKing Turnigy Voltage Booster realisiert. Firmware flashen, Voltage Booster montieren, zusammenstecken, Kabel anlöten… und fertig ist die 1000%ig perfekte BLHeliBox… siehe hier, oder im Tutorial. Ein Video von Nimic’s Aufbau:
video by nimic @ helifreak
– Windows GUI BLHeliTool zum Konfigurieren und Flashen von BLHeli-BESCs (Screenshots der Version v1.00).
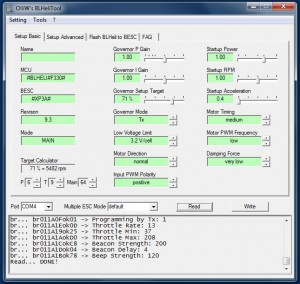
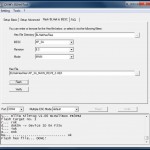

– Copperclad’s detaillierte Beschreibung, gleiche Anwendung für BLHeli wie oben, allerdings mit einem Arduino Pro Mini mit 328p, 5.0 V, 16 MHz. Sehr ausführliche Bauanleitung mit vielen Bildern. In diesem Post kam ein Arduino UNO zum Einsatz.
– Sirbow2’s detaillierte Beschreibung bei rcgroups, für Arduino Boards im Allgemeinen (veraltet, bitte „offiziellen“ Tutorials folgen)
– Wilsonn1996 konnte erfolgreich einen Arduino Mega 2560 als owSilProg-Programmer zum Flashen benutzen, siehe hier.
– Dehas war kreativ und benutzt einen Emartuino, siehe hier
– Fnodado war auch kreativ und benutzte seine CRIUS MultiWII zum Flashen von Turnigy 25 AEs, siehe hier.
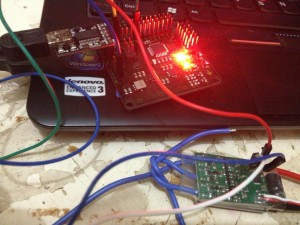
photo by fnodado @ rcgroups
– Eric hatte die geniale Idee einen Cheapduino als Multiple-ESC-Mode fähigen owSilProg-Programmierer für seinen Quadrocopter zu verwenden! Spitze! (siehe auch hier)
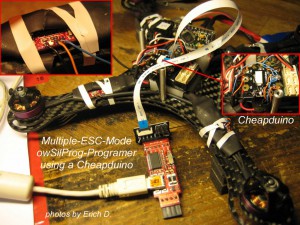
adapted from photos by Eric
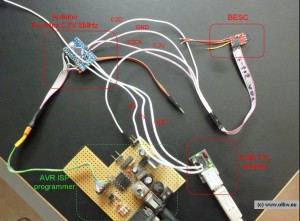
– So hat es angefangen, mein Test- und Entwicklungsaufbau. Arduino Pro Mini mit 328p, 3.3 V, 8 MHz mit USB-TTL FT2323RL Adapter zum Flashen eines BESC mit der BLHeli Firmware von sskaug. Dazu gibt es noch die Windows GUI BLHeliTool um die Parameter der BESC einzustellen. Das war wie gesagt nur mein Test/Entwicklungsaufbau, die Geschichte hat sich weiterentwickelt: Die bisher einfachste/billigste Lösung basiert auf einem Arduino Nano, wie oben beschrieben. Auch die nun verfügbare Software macht den Umbau jeden Arduinos zu einem owSilProg-Programmer zum Kinderspiel (siehe dieses Tutorial).
Aktuelle Firm- und Software
1. Okt. 2013, release v20131027
Firmware owSilProg v1.20,1.21:
– für ATmega328p @ 16MHz: owsilprog_v120_m328p_16mhz_pb3pb4.hex
– für ATmega328p @ 8MHz: owsilprog_v120_m328p_8mhz_pb3pb4.hex
– für ATmega168 @ 16MHz: owsilprog_v120_m168_16mhz_pb3pb4.hex
– für ATmega1280 @ 16MHz: owsilprog_v120_m1280_16mhz_pb2pb3.hex
– für ATmega2560 @ 16MHz: owsilprog_v120_m2560_16mhz_pb2pb3.hex
– für ATmega8 @ 16MHz: owsilprog_v121_m8_16mhz_pb3pb4.hex
– für ATmega8 @ 8MHz: owsilprog_v120_m8_8mhz_pb3pb4.hex
– für ArduFlyer (Mega2560): owsilprog_v120_m2560_16mhz_pf1pf0_arduflyer.hex
– für Cheapduino (Mega8): owsilprog_v121_m8_16mhz_pb3pb2_cheapduino.hex
Windows GUI BLHeliTool v1.22:
– BLHeliTool_v122.exe, BLHeliTool.ini, BLHeliTool.dev
Firmware BLHeliBox v1.20:
– für ATmega328p @ 16MHz: BLHeliBox_v120_m328p_16MHz_pb3pb4.hex,
BLHeliBox_v120_lcd4884_m328p_16MHz_pb3pb4.hex,
BLHeliBox_v120_lcd4884_no5_m328p_16MHz_pb3pb4.hex
Windows GUI AvrBurnTool v1.01:
– AvrBurnTool_v101.exe, AvrBurnTool.ini, AvrBurnTool4owSilProg.dev
Avrdude 5.11.1:
– avrdude.exe, avrdude.conf (modified to handle Arduino Mega boards)
Arduino 1.0.1:
– libusb0.dll, boards.txt, drivers folder
BLHeli:
– alle Hex Files Rev8.0 bis Rev10.4 (Danke Steffen alias sskaug!)
Alles zusammen als zip File: owSilProg BLHeliTool BLHeliBox v20131027 [.zip] (11.7 MB)
Bauanleitungen und Tutorials zum owSilProg Projekt, BLHeliTool und der BLHeliBox findet ihr hier.
Nutzungsbedingungen/Terms of usage: The softwares/firmwares are NOT FREE. You may use it gratis and freely for private purposes only. You may not distribute it publicly or include it in distributions; use links to this page. It is strictly forbidden to use the work in full or in parts in any manner that is intended for or directed toward commercial advantage or private monetary compensation, except you have a written agreement by the author.
Acknowledgements: Die BLHeli Firmware ist von Steffen/sskaug. Dank an ihn für die grossartige Arbeit. Der Target-Calculator in BLHeliTool wurde durch 4712’s BLHeli-Setup Program inspiriert. Dank an ihn für die tolle Idee.
Hinweis: Ab Rev9.0 hängen einige der Defaultwerte nicht nur vom Mode (Main, Tail, Multi) sondern auch vom Typ des ESC ab… das wird (bisher) nicht in BlHeliTool berücksichtigt, d.h. beim Ausführen von ‚Default‘ werden für einige ESCs die Parameterwerte nicht auf die tatsächlichen Defaultwerte zurück gesetzt. Alle anderen Funktionen funktionieren ohne Einschränkung.
“Features” in v20130320 – v20131027
Änderungen in owSilProg v1.20,v1.21:
– keine
Änderungen in BLHeliTool v1.20,v1.21,v1.22:
– Unterstützung von BLHeli 10.1, 10.2, 10.3, 10.4
Änderungen in BLHeliBox v1.20:
– keine
Änderungen in AvrburnTool v1.01:
– keine
“Features” in v20130222b
Änderungen in owSilProg v1.20:
– Anpassungen entsprechend des 1/13-Updates der AN127 von Silabs
– Unterstützung von 14 C8051F Familien: F30x-F39x, F41x, F50x-F53x, F80x-F83x, F91x/92x
Änderungen in BLHeliTool v1.20:
– Unterstützung von BLHeli 10.0
– Unterstützung von 14 C8051F Familien: F30x-F39x, F41x, F50x-F53x, F80x-F83x, F91x/92x
Änderungen in BLHeliBox v1.20:
– Unterstützung von BLHeli 10.0
Änderungen in AvrburnTool v1.01:
– Bug beseitigt


Pingback: Stigern.Net » Blog Archive » Guide: Flashing Hobbywing Skywalker 20A ESC with BLHeli Firmware
Pingback: Anonym